Alarming
Tutorial for creating and managing alerts on time series and meta-data.
Overview
In this article, you will learn how to set up alarms on time series and meta-data on the aedifion.io platform. Currently, the aedifion.io platform supports two types of alarms: i) alarms on the observations for a datapoint and ii) alarms on the throughput (i.e., received observations per time interval) of a certain datapoint or a whole project. You will specify one of each and configure it to send out notifications on alarm events via the Telegram instant messenger, email, or Microsoft Teams.
Preliminaries
The examples provided in this article partly build on each other. For the sake of brevity, boiler plate code such as imports or variable definitions is only shown once and left out in subsequent examples.
To execute the examples provided in this tutorial, the following is needed:
- A valid login (username and password) to the aedifion.io platform. If you do not have a login yet, please contact us regarding a demo login. The login used in the example will not work!
- A project with live data ingress.
- Optionally, a working installation of Python or Curl.
Types of alarms
The aedifion.io platform supports two versatile types of alarms:
- Threshold alarms are defined on single datapoints and trigger an alarm whenever the measured values for that datapoint exceed (or fall below) a certain threshold. Three severity levels are supported: info, warning, and critical. Each level can optionally have a separate reset threshold to implement hysteresis and prevent flapping. A typical use case for threshold alarms is notifying about unwanted system conditions such as high CO2 concentration in offices.
- Throughput alarms are defined on single datapoints or whole projects and trigger an alarm whenever the measured throughput for that datapoint or project crosses certain thresholds. Throughput is measured as the number of values received per
period, whereperiodis a configurable time window (e.g., the number of values received every 10 minutes). Three severity levels (info, warning, critical) indicate the severity of abnormal throughput. Please contact us to get to know your project's typical data throughput. A typical use case for throughput alarms is fault detection by monitoring of the operational health of the building automation systems, e.g., alerting about the unscheduled shut-down of a critical component or notifying when a sensor is dead.
Further types of alarms will be added in future. If you have a special request, please contact us.
Adding alarms
Threshold and throughput alarms are created through separate endpoints. The parameters that specify the alarm must be encoded as a JSON object and sent in the body of the request.
Adding a threshold alarm
A new threshold alarm is created through the POST /v2/alert/threshold endpoint. The project_id is passed as a query parameter.
Threshold alarms are defined through the following parameters.
| Parameter | Datatype | Type | Required | Description | Example |
|---|---|---|---|---|---|
| name | string | body (JSON) | yes | The name of the new alarm. Must be unique within the project scope. | CO2_Office100 |
| description | string | body (JSON) | no | Free text description of the alert. | Alert on indoor CO2 level |
| dataPointID | string | body (JSON) | yes | The alphanumeric id of the datapoint on which to send alarms. | bacnet100-4120-CO2 |
| thresholds.info | float | body (JSON) | yes | The threshold at which the info severity level is triggered. | 600 |
| thresholds.info_reset | float | body (JSON) | no | The threshold at which the info level is reset. Defaults to the value of info. | 500 |
| thresholds.warn | float | body (JSON) | yes | The threshold at which the warning severity level is triggered. | 1000 |
| thresholds.warn_reset | float | body (JSON) | no | The threshold at which the warning level is reset. Defaults to the value of warn. | 900 |
| thresholds.crit | float | body (JSON) | yes | The threshold at which the critical severity level is triggered. | 2500 |
| thresholds.crit_reset | float | body (JSON) | no | The threshold at which the critical level is reset. Defaults to the value of crit. | 2000 |
| repeat | string | body (JSON) | no | Time duration after which to re-send a notification if the alert state has not changed (w = weeks, d = days, h = hours, m = minutes, s = seconds). Defaults to 1h. | 2h |
| notification.email.recipients | list of strings | body (JSON) | no | Email addresses to which notifications are sent when the alarm is triggered. | ["john.doe@aedifion.com"] |
| notification.telegram.chat_ids | list of strings | body (JSON) | no | Telegram chat IDs where notifications are sent (must be chats that involve @aedifion_bot). | ["-219643311"] |
| notification.ms_teams.webhook_urls | list of strings | body (JSON) | no | Microsoft Teams incoming webhook URLs to which notifications are sent. Each must be a valid https:// URL and must not contain commas, quotes, or backslashes. Each URL is itself the credential for its channel. | ["https://example.webhook.office.com/webhookb2/..."] |
| notification.dashboard.enabled | boolean | body (JSON) | no | Whether to show alerts on the alarm dashboard. Defaults to false. | false |
| attributes | object | body (JSON) | no | Key-value tags to assign to the alert for categorization. | {"category": "comfort", "team": "Operations"} |
Threshold order is automatically determined from the provided threshold values:
- If
info < warn < crit, the order is ascending — the alert gets more critical as values increase. - If
info > warn > crit, the order is descending — the alert gets more critical as values decrease.
Reset thresholds implement hysteresis. For example, with an ascending alert, a critical alert triggers when observations reach or exceed thresholds.crit and resets only when they fall below thresholds.crit_reset. This prevents the alert from rapidly toggling on and off when values hover around a threshold. If you do not need hysteresis, simply omit the reset values — they will default to the trigger values.
Let's add a threshold alarm on CO2 concentration and see what happens.
from requests import post, get, delete

project_id = 4
api_url = 'https://api3.aedifion.io'
auth_john = ("john.doe@aedifion.com", "mys3cr3tp4ssw0rd")
newalert = {
    "name": "CO2_Office100",
    "description": "Alert on indoor CO2 level with three severity levels.",
    "dataPointID": "bacnet100-4120-CO2",
    "thresholds": {
        "info": 600,
        "info_reset": 500,
        "warn": 1000,
        "warn_reset": 900,
        "crit": 2500,
        "crit_reset": 2000
    },
    "repeat": "2h",
    "notification": {
        "email": {
            "recipients": ["john.doe@aedifion.com"]
        },
        "telegram": {
            "chat_ids": ["-219643311"]
        },
        "ms_teams": {
            "webhook_urls": ["https://example.webhook.office.com/webhookb2/..."]
        },
        "dashboard": {
            "enabled": False
        }
    },
    "attributes": {
        "category": "comfort",
        "team": "Operations"
    }
}

r = post(f"{api_url}/v2/alert/threshold",
         auth=auth_john,
         params={"project_id": project_id},
         json=newalert)

print(r.status_code, r.text)
curl "https://api3.aedifion.io/v2/alert/threshold?project_id=4"
    -X POST
    -u john.doe@aedifion.com:mys3cr3tp4ssw0rd
    -H 'Content-Type: application/json'
    -d '{
          "name": "CO2_Office100",
          "description": "Alert on indoor CO2 level with three severity levels.",
          "dataPointID": "bacnet100-4120-CO2",
          "thresholds": {
              "info": 600,
              "info_reset": 500,
              "warn": 1000,
              "warn_reset": 900,
              "crit": 2500,
              "crit_reset": 2000
          },
          "repeat": "2h",
          "notification": {
              "email": {
                  "recipients": ["john.doe@aedifion.com"]
              },
              "telegram": {
                  "chat_ids": ["-219643311"]
              },
              "ms_teams": {
                  "webhook_urls": ["https://example.webhook.office.com/webhookb2/..."]
              },
              "dashboard": {
                  "enabled": false
              }
          },
          "attributes": {
              "category": "comfort",
              "team": "Operations"
          }
        }'
- Point your browser to https://api3.aedifion.io/ui/.
- Click "Authorize" on the upper right and provide your login.
- From the main tags, select the Alert tag, then the
POST /v2/alert/thresholdendpoint (green). - Enter the
project_idin the query parameter field. - Enter the following JSON example in the new_alert body field:
{ "name": "CO2_Office100", "description": "Alert on indoor CO2 level with three severity levels.", "dataPointID": "bacnet100-4120-CO2", "thresholds": { "info": 600, "info_reset": 500, "warn": 1000, "warn_reset": 900, "crit": 2500, "crit_reset": 2000 }, "repeat": "2h", "notification": { "email": { "recipients": ["john.doe@aedifion.com"] }, "telegram": { "chat_ids": ["-219643311"] }, "ms_teams": { "webhook_urls": ["https://example.webhook.office.com/webhookb2/..."] }, "dashboard": { "enabled": false } }, "attributes": { "category": "comfort", "team": "Operations" } } - Click "Try it out!".
- Inspect the response body and code.
The JSON-formatted response (HTTP 201) confirms that the alarm was successfully created and returns the details of the alarm:
{
  "id": 6,
  "name": "CO2_Office100",
  "description": "Alert on indoor CO2 level with three severity levels.",
  "alert_type": "threshold",
  "project_id": 4,
  "status": "Enabled",
  "created": "2024-01-15T10:30:00.000000Z",
  "updated": "2024-01-15T10:30:00.000000Z",
  "dataPointID": "bacnet100-4120-CO2",
  "threshold_info": 600,
  "threshold_info_reset": 500,
  "threshold_warn": 1000,
  "threshold_warn_reset": 900,
  "threshold_crit": 2500,
  "threshold_crit_reset": 2000,
  "threshold_order": "asc",
  "repeat": "2h",
  "email": "john.doe@aedifion.com",
  "telegram_chatid": "-219643311",
  "teams_webhook": "https://example.webhook.office.com/webhookb2/...",
  "alarm_dashboard": false,
  "attributes": {"category": "comfort", "team": "Operations"}
}
Note that the alarm has received a unique numeric id (6) and has been enabled immediately. The repeat value you provided during creation is returned in the repeat field. Threshold alarms have no measurement period — that field is only present on throughput alarms.
Response format differs from request
The response uses a flat structure while the request uses nested objects. Specifically:
thresholds.info,thresholds.warn,thresholds.crit(and their_resetvariants) become flat fieldsthreshold_info,threshold_warn,threshold_crit, etc.notification.email.recipients(a list) becomes a singleemailstring with recipients joined by commas.notification.telegram.chat_ids(a list) becomes a singletelegram_chatidstring with IDs joined by commas.notification.ms_teams.webhook_urls(a list) becomes a singleteams_webhookstring with URLs joined by commas.notification.dashboard.enabledbecomesalarm_dashboard.
You may already receive alarms or try to provoke some by gathering a few people in your office or by directly breathing into the CO2 sensor. But first, we will add an alarm of the second type, i.e., throughput. Later, we will also look at how to test your alarms by deliberately setting low thresholds.
Adding a throughput alarm
A new throughput alarm is created through the POST /v2/alert/throughput endpoint. The project_id is passed as a query parameter.
Throughput alarms are defined through the following parameters.
| Parameter | Datatype | Type | Required | Description | Example |
|---|---|---|---|---|---|
| name | string | body (JSON) | yes | The name of the new alarm. Must be unique within the project scope. | EON_ERC_Throughput |
| description | string | body (JSON) | no | Free text description of the alert. | Alert on project data ingress |
| dataPointID | string | body (JSON) | no | The alphanumeric id of the datapoint on which to measure throughput. If not provided, throughput of the whole project is measured. | bacnet100-4120-CO2 |
| thresholds.info | float | body (JSON) | yes | First threshold at which throughput is considered slightly abnormal (values per period). | 50 |
| thresholds.info_reset | float | body (JSON) | no | Threshold at which the info level is reset. Defaults to the value of info. | 60 |
| thresholds.warn | float | body (JSON) | yes | Second threshold at which throughput is considered significantly abnormal (values per period). | 20 |
| thresholds.warn_reset | float | body (JSON) | no | Threshold at which the warning level is reset. Defaults to the value of warn. | 25 |
| thresholds.crit | float | body (JSON) | yes | Third threshold at which throughput is considered critically abnormal (values per period). | 0 |
| thresholds.crit_reset | float | body (JSON) | no | Threshold at which the critical level is reset. Defaults to the value of crit. | 2 |
| period | string | body (JSON) | yes | Time period over which to measure throughput (w = weeks, d = days, h = hours, m = minutes, s = seconds). | 10m |
| repeat | string | body (JSON) | no | Time duration after which to re-send a notification if the alert state has not changed. Defaults to 1d. | 1d |
| notification.email.recipients | list of strings | body (JSON) | no | Email addresses to which notifications are sent. | ["john.doe@aedifion.com"] |
| notification.telegram.chat_ids | list of strings | body (JSON) | no | Telegram chat IDs where notifications are sent. | ["-219643311"] |
| notification.ms_teams.webhook_urls | list of strings | body (JSON) | no | Microsoft Teams incoming webhook URLs to which notifications are sent. Each must be a valid https:// URL and must not contain commas, quotes, or backslashes. | ["https://example.webhook.office.com/webhookb2/..."] |
| notification.dashboard.enabled | boolean | body (JSON) | no | Whether to show alerts on the alarm dashboard. Defaults to false. | false |
| attributes | object | body (JSON) | no | Key-value tags to assign to the alert. | {"category": "network", "team": "IT"} |
As with threshold alarms, the threshold order is automatically determined:
- If
info < warn < crit, the alert gets more critical as throughput grows (ascending). - If
info > warn > crit, the alert gets more critical as throughput drops (descending).
newalert = {
    "name": "EON_ERC_Throughput",
    "description": "Alert on project data ingress throughput.",
    "thresholds": {
        "info": 50,
        "info_reset": 60,
        "warn": 20,
        "warn_reset": 25,
        "crit": 0,
        "crit_reset": 2
    },
    "period": "10m",
    "repeat": "1d",
    "notification": {
        "email": {
            "recipients": ["john.doe@aedifion.com"]
        },
        "telegram": {
            "chat_ids": ["-219643311"]
        },
        "ms_teams": {
            "webhook_urls": ["https://example.webhook.office.com/webhookb2/..."]
        }
    }
}

r = post(f"{api_url}/v2/alert/throughput",
         auth=auth_john,
         params={"project_id": project_id},
         json=newalert)

print(r.status_code, r.text)
curl "https://api3.aedifion.io/v2/alert/throughput?project_id=4"
    -X POST
    -u john.doe@aedifion.com:mys3cr3tp4ssw0rd
    -H 'Content-Type: application/json'
    -d '{
          "name": "EON_ERC_Throughput",
          "description": "Alert on project data ingress throughput.",
          "thresholds": {
              "info": 50,
              "info_reset": 60,
              "warn": 20,
              "warn_reset": 25,
              "crit": 0,
              "crit_reset": 2
          },
          "period": "10m",
          "repeat": "1d",
          "notification": {
              "email": {
                  "recipients": ["john.doe@aedifion.com"]
              },
              "telegram": {
                  "chat_ids": ["-219643311"]
              },
              "ms_teams": {
                  "webhook_urls": ["https://example.webhook.office.com/webhookb2/..."]
              }
          }
        }'
- Point your browser to https://api3.aedifion.io/ui/.
- Click "Authorize" on the upper right and provide your login.
- From the main tags, select the Alert tag, then the
POST /v2/alert/throughputendpoint (green). - Enter the
project_idin the query parameter field. - Enter the following JSON example in the new_alert body field:
{ "name": "EON_ERC_Throughput", "description": "Alert on project data ingress throughput.", "thresholds": { "info": 50, "info_reset": 60, "warn": 20, "warn_reset": 25, "crit": 0, "crit_reset": 2 }, "period": "10m", "repeat": "1d", "notification": { "email": { "recipients": ["john.doe@aedifion.com"] }, "telegram": { "chat_ids": ["-219643311"] }, "ms_teams": { "webhook_urls": ["https://example.webhook.office.com/webhookb2/..."] } } } - Click "Try it out!".
- Inspect the response body and code.
The response (HTTP 201) confirms the creation:
{
  "id": 7,
  "name": "EON_ERC_Throughput",
  "description": "Alert on project data ingress throughput.",
  "alert_type": "throughput",
  "project_id": 4,
  "status": "Enabled",
  "created": "2024-01-15T11:00:00.000000Z",
  "updated": "2024-01-15T11:00:00.000000Z",
  "dataPointID": "",
  "threshold_info": 50,
  "threshold_info_reset": 60,
  "threshold_warn": 20,
  "threshold_warn_reset": 25,
  "threshold_crit": 0,
  "threshold_crit_reset": 2,
  "threshold_order": "desc",
  "period": "10m",
  "repeat": "1d",
  "email": "john.doe@aedifion.com",
  "telegram_chatid": "-219643311",
  "teams_webhook": "https://example.webhook.office.com/webhookb2/...",
  "alarm_dashboard": false,
  "attributes": ""
}
Since no dataPointID was provided, the throughput of the whole project is measured.
Response format differs from request
As with threshold alerts, the response uses a flat structure. See the note above for details on how nested request fields map to flat response fields.
Testing your alarms
The previous alarm might have been set too defensively and not trigger unless there is a small party going on in your office. To provoke a threshold alarm and verify it works, you can create an alert with deliberately low thresholds that will trigger immediately, e.g., set "crit": 200 for a CO2 sensor that normally reads above 400 ppm. You may also try to provoke some alerts by gathering a few people in your office or by directly breathing into the CO2 sensor. You will soon see alerts from @aedifion_bot arriving in your Telegram chat (or to your email).
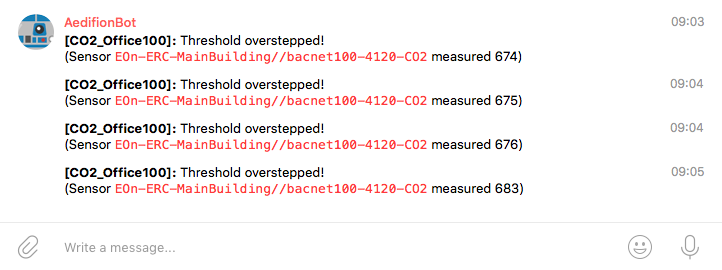
Figure 1: Telegram alerts on CO2 concentration in action
Similarly, you can provoke a throughput alarm by setting very high thresholds, e.g., "crit": 20000, "warn": 50000 and "info": 100000.
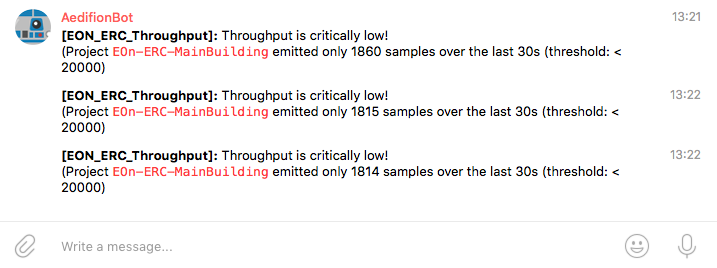
Figure 2: Telegram alert on project throughput in action
Modifying alarms
Note
The API does not support modifying an existing alarm in place. To change an alarm's configuration (e.g., adjust thresholds or notification recipients), delete the existing alarm and create a new one with the updated parameters. See Deleting alarms and Adding alarms.
Enabling and disabling alarms
Since the alarm might now be triggering notifications frequently, let's take a break and disable it. You can disable an alarm to temporarily stop it from sending notifications, and enable it again later. There are two separate endpoints for this: POST /v2/alert/{alert_id}/disable and POST /v2/alert/{alert_id}/enable.
Disabling an alarm
alert_id = 6
r = post(f"{api_url}/v2/alert/{alert_id}/disable",
         auth=auth_john)
print(r.status_code, r.text)
curl "https://api3.aedifion.io/v2/alert/6/disable"
    -X POST
    -u john.doe@aedifion.com:mys3cr3tp4ssw0rd
- Point your browser to https://api3.aedifion.io/ui/.
- Click "Authorize" on the upper right and provide your login.
- From the main tags, select the Alert tag, then the
POST /v2/alert/{alert_id}/disableendpoint. - Provide the alert_id.
- Click "Try it out!".
- Inspect the response body and code.
The response (HTTP 200) returns the alert with its updated status:
{
  "id": 6,
  "name": "CO2_Office100",
  "description": "Alert on indoor CO2 level with three severity levels.",
  "alert_type": "threshold",
  "project_id": 4,
  "status": "Disabled",
  "created": "2024-01-15T10:30:00.000000Z",
  "updated": "2024-01-15T10:35:00.000000Z",
  "dataPointID": "bacnet100-4120-CO2",
  "threshold_info": 600,
  "threshold_info_reset": 500,
  "threshold_warn": 1000,
  "threshold_warn_reset": 900,
  "threshold_crit": 2500,
  "threshold_crit_reset": 2000,
  "threshold_order": "asc",
  "repeat": "2h",
  "email": "john.doe@aedifion.com",
  "telegram_chatid": "-219643311",
  "teams_webhook": "https://example.webhook.office.com/webhookb2/...",
  "alarm_dashboard": false,
  "attributes": {"category": "comfort", "team": "Operations"}
}
Enabling an alarm
To re-enable the alarm, use the enable endpoint:
alert_id = 6
r = post(f"{api_url}/v2/alert/{alert_id}/enable",
         auth=auth_john)
print(r.status_code, r.text)
curl "https://api3.aedifion.io/v2/alert/6/enable"
    -X POST
    -u john.doe@aedifion.com:mys3cr3tp4ssw0rd
- Point your browser to https://api3.aedifion.io/ui/.
- Click "Authorize" on the upper right and provide your login.
- From the main tags, select the Alert tag, then the
POST /v2/alert/{alert_id}/enableendpoint. - Provide the alert_id.
- Click "Try it out!".
- Inspect the response body and code.
The response (HTTP 200) returns the alert with "status": "Enabled".
Listing alarms
You can list all alarms using the GET /v2/project/{project_id}/alerts endpoint. The response is paginated and supports filtering, searching, and sorting.
| Parameter | Datatype | Type | Required | Description | Default |
|---|---|---|---|---|---|
| project_id | integer | path | yes | The numeric id of the project. | — |
| page | integer | query | no | Page number. | 1 |
| per_page | integer | query | no | Items per page (maximum 100). | 20 |
| search | string | query | no | Filter alerts by name substring. | — |
| filter | string | query | no | Filter by key=value pairs, separated by ;. Keys: alert_type, dataPointID. Filters with the same key are combined with OR, different keys with AND. | — |
| sort_by | string | query | no | Sort by field: id, name, or alert_type. | id |
| sort_order | string | query | no | Sort order: asc or desc. | asc |
r = get(f"{api_url}/v2/project/{project_id}/alerts",
        auth=auth_john,
        params={"per_page": 50})
print(r.status_code, r.text)
curl "https://api3.aedifion.io/v2/project/4/alerts?per_page=50"
    -X GET
    -u john.doe@aedifion.com:mys3cr3tp4ssw0rd
- Point your browser to https://api3.aedifion.io/ui/.
- Click "Authorize" on the upper right and provide your login.
- From the main tags, select the Project tag, then the
GET /v2/project/{project_id}/alertsendpoint (blue). - Provide the project_id and optionally set pagination/filter parameters.
- Click "Try it out!".
- Inspect the response body and code.
The response is a paginated object containing a list of alerts and pagination metadata. Among them, we find the alarms we defined previously. Note that the previously disabled alarm has "status": "Disabled" because we paused it earlier.
{
  "items": [
    {
      "id": 6,
      "name": "CO2_Office100",
      "description": "Alert on indoor CO2 level with three severity levels.",
      "alert_type": "threshold",
      "project_id": 4,
      "status": "Disabled",
      "created": "2024-01-15T10:30:00.000000Z",
      "updated": "2024-01-15T10:35:00.000000Z",
      "dataPointID": "bacnet100-4120-CO2",
      "threshold_info": 600,
      "threshold_info_reset": 500,
      "threshold_warn": 1000,
      "threshold_warn_reset": 900,
      "threshold_crit": 2500,
      "threshold_crit_reset": 2000,
      "threshold_order": "asc",
      "repeat": "2h",
      "email": "john.doe@aedifion.com",
      "telegram_chatid": "-219643311",
      "teams_webhook": "https://example.webhook.office.com/webhookb2/...",
      "alarm_dashboard": false,
      "attributes": {"category": "comfort", "team": "Operations"}
    },
    {
      "id": 7,
      "name": "EON_ERC_Throughput",
      "description": "Alert on project data ingress throughput.",
      "alert_type": "throughput",
      "project_id": 4,
      "status": "Enabled",
      "created": "2024-01-15T11:00:00.000000Z",
      "updated": "2024-01-15T11:00:00.000000Z",
      "dataPointID": "",
      "threshold_info": 50,
      "threshold_info_reset": 60,
      "threshold_warn": 20,
      "threshold_warn_reset": 25,
      "threshold_crit": 0,
      "threshold_crit_reset": 2,
      "threshold_order": "desc",
      "period": "10m",
      "repeat": "1d",
      "email": "john.doe@aedifion.com",
      "telegram_chatid": "-219643311",
      "teams_webhook": "https://example.webhook.office.com/webhookb2/...",
      "alarm_dashboard": false,
      "attributes": ""
    }
  ],
  "meta": {
    "total_items": 2,
    "items_per_page": 50,
    "current_page": 1,
    "total_pages": 1
  }
}
Legacy alerts
Alerts created before February 2024 may have different field formats in the listing response:
threshold_okandthreshold_deadmay be present with actual values.attributesmay be returned as a string (e.g."category=comfort;team=Operations;") instead of an object.
You can also filter results, for example to show only threshold alarms:
r = get(f"{api_url}/v2/project/{project_id}/alerts",
        auth=auth_john,
        params={"filter": "alert_type=threshold"})
print(r.text)
curl "https://api3.aedifion.io/v2/project/4/alerts?filter=alert_type%3Dthreshold"
    -X GET
    -u john.doe@aedifion.com:mys3cr3tp4ssw0rd
Deleting alarms
Deleting an alarm is a simple matter of calling DELETE /v2/alert/{alert_id}. The response is HTTP 204 (No Content) with an empty body.
As an example, we now delete the threshold alarm that we have previously created.
alert_id = 6
r = delete(f"{api_url}/v2/alert/{alert_id}",
           auth=auth_john)
print(r.status_code)
curl "https://api3.aedifion.io/v2/alert/6"
    -X DELETE
    -u john.doe@aedifion.com:mys3cr3tp4ssw0rd
- Point your browser to https://api3.aedifion.io/ui/.
- Click "Authorize" on the upper right and provide your login.
- From the main tags, select the Alert tag, then the
DELETE /v2/alert/{alert_id}endpoint (red). - Provide the alert_id.
- Click "Try it out!".
- Inspect the response code (204 indicates success).
Go ahead and also delete the throughput alarm, then call GET /v2/project/{project_id}/alerts to verify that both alarms are gone.