Authentication
How to authenticate to the aedifion.io HTTP API.
Overview
In this tutorial, we cover the topic of authenticating to the aedifion HTTP API. You will learn why authentication is required and what the authenticated user identity is used for. The main part of this article shows in concrete examples how to authenticate from your browser, your scripts, and other common tools.
When is authentication required?
Authentication is required for all endpoints of the aedifion HTTP API except for the Meta endpoints. Calling any of the other endpoints without authentication results in the following 401 - Unauthorized error:
{
  "error": "Unauthorized access",
  "success": false
}
When you encounter this error on the aedifion HTTP API, this article will help you fix it.
Why is authentication required and what is it used for?
Authentication allows the API to identify the user that is interacting with it. In the case of the aedifion API, the user's unique identity is his/her email address which is associated to further optional identity data such as his/her name, address, and phone number.
Based on his/her authenticated identity, a user is then authorized to perform certain actions (e.g., call an endpoint on a specific project). Preventing unauthorized accesses is the single most important reason for requiring authentication (this is probably true in any computer system).
A second important reason for authentication is auditing all authorized requests. This is necessary to answer all who-did-what type of questions.
Finally, the authenticated user identity is used to personalize the user experience, e.g., setting the user's main language, loading his/her favorites, etc. Such information is stored in the backend instead of, e.g., in a browser cookie, in order to provide users a consistent user experience across all their devices and across all of aedifion's services.
What authentication methods are available?
Users can authenticate by one of two methods:
-
HTTP Basic Auth: As defined in [RFC7617], the user provides his/her username and password with each request. Basic Auth is one of the first and simplest authentication methods and is still widely used on the Web, today. However, it lacks support for important features such as single-sign-on and two-factor authentication.
-
OIDC: Open ID Connect (OIDC) is an authentication layer on top of the OAuth 2.0 authorization framework. OIDC and OAuth 2.0 are both open standards. In OIDC, a user that wishes to use a service such as the aedifion HTTP API, authenticates not against this service but against a central Identity Provider (IP). The IP authenticates the user and issues an access token comprising identity and, possibly, authorization claims which the user in a subsequent step presents to the target service to access it. While the IP presents one step of indirection, it facilitates for single-sign-on across different services and provides a central log-on that can be further secured through two-factor authentication.
The aedifion HTTP API supports Basic Auth for legacy reasons until further notice. HTTP Basic Auth may be deprecated in future. New applications, scripts, and programs should thus be built using OIDC-based authentication.
Basic Auth
In HTTP Basic Authentication, the user (or user's agent) simply embeds the base64 encoding of his/her username and password within the header of each request. E.g. a user john.doe@aedifion.com with password s3cur3p4ssw0rd would add the following HTTP header to each request:
authorization: Basic aHppZWdlbGRvcmZAYWVkaWZpb24uY29tOm5ld3Bhc3N3b3Jk
Note that base64 is not an encryption. You can copy-paste the encoded part above into any base64 decoder and will see the username and password in clear. Because credentials are essentially sent in clear, HTTP Basic Auth must always be used over an encrypted channel, i.e., HTTPS. Otherwise, the credentials could be easily read by any man-in-the-middle.
Of course, you do not have to base64-encode those credentials and add that header yourself. Most tools and programming languages will have built-in functionalities or third-party libraries that do this job for you.
In the following, we provide examples for HTTP Basic Auth-based authentication to the aedifion HTTP API using a few common tools and languages. To keep it simple, we will in all examples only make a single call to the GET /v2/user endpoint, which provides details for the authenticated user. Please note that the used credentials will not actually work.
Curl takes username and password for Basic Auth through the -u, --user option. Username and password need to be separated by a colon.
curl "https://api.aedifion.io/v2/user"
    -u john.doe@aedifion.com:s3cur3p4ssw0rd
There are several ways to set Basic Auth credentials in Postman. Preferably, you should set up authentication within a dedicated environment. In this environment, add variables email (or username) and password.
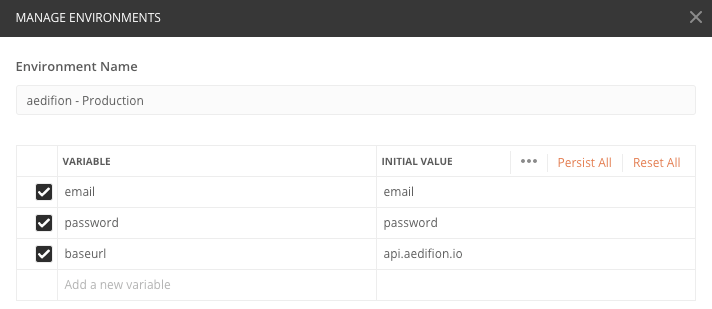
Figure 1: Manage environments in Postman
On your collection (left pane), click the three dots and choose Edit from the drop-down and navigate to the Authorization tab. Choose Basic Auth as type and enter variables {{ email }} and {{ password }} as email and password, respectively. These variables will be replaced with the actual values defined in your environment.
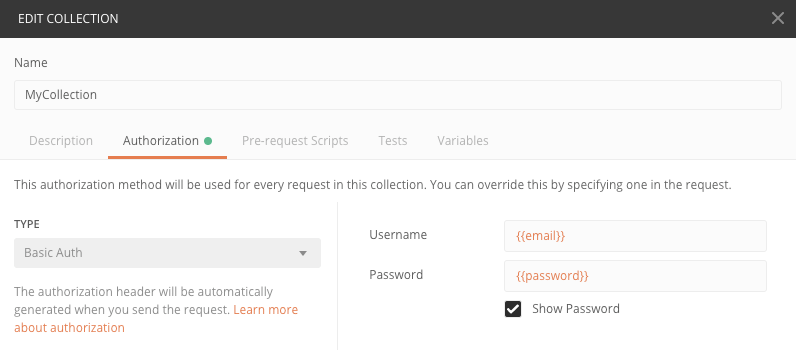
Figure 2: Edit collections in Postman
Note that you can also define this individually per request if you do not want to use the same authentication method and credentials for all requests in your collection.
By redefining baseurl, email and password variables in different environments, you can quickly switch APIs and users just by switching the environment from the dropdown on the top right.

The Swagger UI is an interactive UI for the aedifion HTTP API auto-generated from the API's OpenAPI specification.
- Open https://api.aedifion.io/ui/ in a browser.
- Click "Authorize" on the top right.
- In the pop-up, enter username and password in the respective fields. Swagger UI will cache your credentials on your device until you close the browser tab.
- Click the bottom "Authorize" button. Note that the Swagger UI does not actively check the validity of your credentials at this point. You will only notice on your first request if you entered wrong credentials.
- Drop down the "User" section and choose the
GET /v2/userendpoint. - Click "Try it out!"
In Python, the excellent requests module takes Basic Auth credentials formatted as a tuple of username and password through the optional keyword parameter auth:
import requests

api_url = "https://api.aedifion.io"
auth_john = ("john.doe@aedifion.com", "mys3cr3tp4ssw0rd")
r = requests.get(f"{api_url}/v2/user", auth=auth_john)
Open ID Connect
Open ID Connect (and OAuth) are rather involved protocols with many application scenarios. An in depth treatment of these protocols is out of scope here, and we only cover the absolute basics required to understand the OIDC-based authentication process.
Work in Progress
In the following, we provide examples for OIDC-based authentication to the aedifion HTTP API using a few common tools and languages. To keep it simple, we will in all examples only make a single call to the GET /v2/user endpoint, which provides details for the authenticated user.
Please note that OAuth 2.0 knows four grant types (not counting several extension grants) which OIDC complements with three authentication flows. The examples presented in the following are thus only one way to do it and there are certainly others (which might better suit other scenarios).
In this example, we use OIDC's "Direct Access Grant" to obtain an access token directly from the Identity Provider.
- Obtain the token and store it in a local variable.
- Pass the obtained token as Bearer Token in the HTTP authorization header to authenticate the API request.
## Lines 3-10 are formatted in multiple lines for better readability.
## Remove newlines before pasting to the command line.
TOKEN=$(curl -X POST
             -H "Content-Type: application/x-www-form-urlencoded"
             -d "grant_type=password"
             -d "client_id=tutorial-curl"
             -d "username=john.doe@aedifion.com"
             -d "password=s3cur3p4ssw0rd"
             "https://auth.aedifion.io/auth/realms/aedifion/protocol/openid-connect/token"
       | jq -r '.access_token')
curl -H "Authorization: Bearer ${TOKEN}" "https://api3.aedifion.io/v2/user"
The above example requires the command line JSON processor jq to be installed in your path. Get it from https://stedolan.github.io/jq/ or remove the jq parsing part and copy-paste the token by hand.
There are several ways to set OIDC-based authentication in Postman. Preferably, you should set up authentication once for your collection and not per individual request.
On your collection (left pane), click the three dots and choose "Edit" from the drop-down and navigate to the "Authorization" tab. Choose OAuth 2.0.

Figure 1: OAuth 2.0 authorization
Now click "Get New Access Token" and fill in the following settings (the full Auth URL is https://auth.aedifion.io/auth/realms/aedifion/protocol/openid-connect/auth):
- Token Name: Choose one, e.g., "aedifion API"
- Grant Type: Implicit
- Callback URL: https://www.getpostman.com/oauth2/callback
- Auth URL: https://auth.aedifion.io/auth/realms/aedifion/protocol/openid-connect/auth
- Client ID: postman
- Client Authentication: Send as Basic Auth header
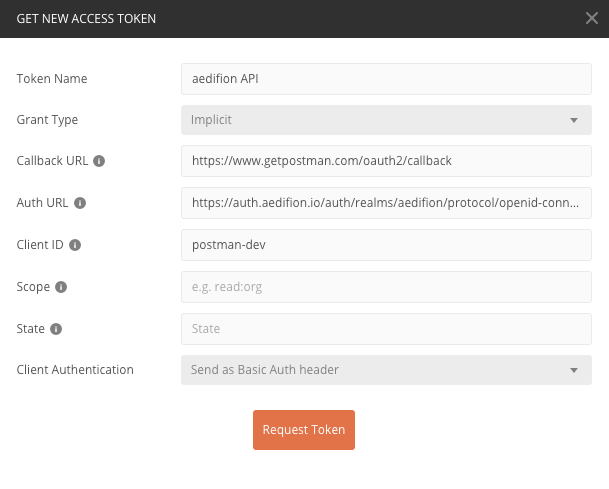
Figure 2: Get a new access token
Click "Request Token". This will kick-off an OAuth 2.0 "Implicit Grant" which redirects you to the login form of the aedifion Identity Provider within a browser-like window directly within Postman. Enter your credentials and login. You will be redirected back to Postman.
Having successfully logged-in, the obtained token will be displayed on the right, and a list of all (previously) obtained tokens on the left. Just close this window for now.
Finally, on the Authorization tab of your collection settings (which should be still open) select the token you've obtained a moment ago from the "Available Tokens" drop-down menu. Click "Update" to finish. You're now ready to fire off your requests to the API - just make sure to not unintentionally override Authorization on request-level.
For more information, see https://learning.getpostman.com/docs/postman/sending-api-requests/authorization/#oauth-20.
The Swagger UI is an interactive UI for the aedifion HTTP API auto-generated from the API's OpenAPI specification.
- Open https://api.aedifion.io/ui/ in a browser.
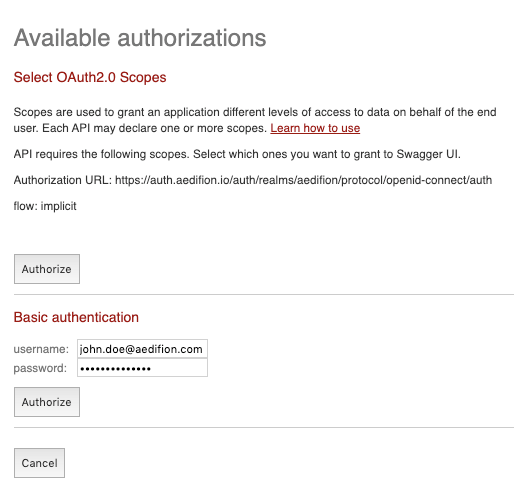
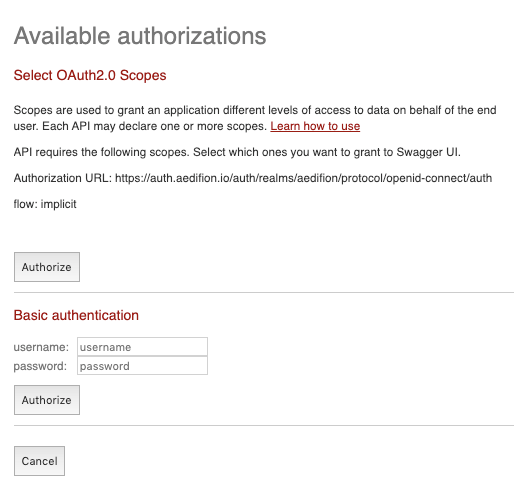
- Click "Authorize" on the top right. This will kick off OIDC's "Implicit flow".
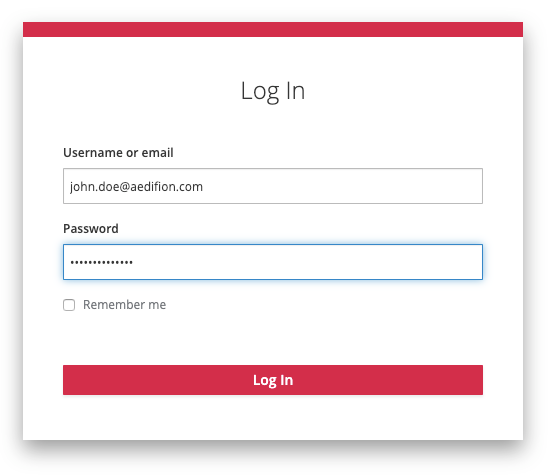
- In the pop-up, ignore the username and password fields and just click the top "Authorize" button. You will be redirected to aedifion's Identity Provider and prompted to log in.
- On the log in form, fill in your email/username and password. Click "Log in". You will be redirected back to the application (i.e., the Swagger UI).
- Drop down the "User" section and choose the
GET /v2/userendpoint. - Click "Try it out!".
Example: Direct Access Grant
We start off with a simple example that uses OIDC's "Direct Access Grant" and is equivalent to the Curl example.
import requests

# Get an access token from the IP
data = {
    "username": "john.doe@aedifion.com",
    "password": "s3cur3p4ssw0rd",
    "grant_type": "password",
    "client_id": "tutorial-python"
}
r = requests.post("https://auth.aedifion.io/auth/realms/aedifion/protocol/openid-connect/token",
                  data=data)  # data will be automatically form-encoded
access_token = r.json()["access_token"]

api_url = 'https://api.aedifion.io'
# Make the actual request and print the results
r = requests.get(f"{api_url}/v2/user",
                 headers={"Authorization": f"Bearer {access_token}"})
print(f"{r.status_code} - {r.text}")
Note that the "Direct Access Grant" used in the above example requires the user to provide username and password to the Python script. In real-world production-grade applications, this is considered insecure in most usage scenarios and should be avoided.
Example: Implicit Flow
As a better alternative, we now use OIDC's full fledged "Authentication Code Flow" in the next examples which redirects the user to the Identity Provider for login and thus does not require the user to entrust the application with his/her credentials.
In the "Authentication Code Flow", unlike the "Implicit Flow", the user receives only an authorization code after login that he/she has to exchange for an access token (and a refresh token and, optionally, an id token) in a subsequent step.
Since the "Authentication Code Flow" requires a lot more legwork than suitable for a short concise example, we provide a lot of the boiler plate code in the oidc-client.py script in aedifion's public repository of code samples.
Go ahead and download that script and install the required modules. Then run the example by:
python3 oidc-client.py -c tutorial-python
The script will open a browser and prompt you to log in to aedifion's Identity Provider. After login, you'll receive an authorization code that you need to input to the python script. The script will then exchange it for an identity, refresh and access token and issue an actual API request.
Note that the obtained tokens are stored in your home directory under folder .aedifion/ after the first login. Any subsequent run of oidc-client.py will find a previously obtained token, so that you do not have to log in again.
The oidc-client.py script supports many more features than discussed above, e.g., it supports Resource Owner Grants and Client Credentials Grants, and facilitates the automatic renewal of expired tokens.