Data import and export
How to ingest and retrieve data.
Overview
In this article, we will go through the process of first ingesting timeseries data into the platform by hand using the CSV upload and later retrieving that timeseries data from the platform using different search criteria.
Preliminaries
The examples provided in this article partly build on each other. For the sake of brevity, boiler plate code such as imports or variable definitions is only shown once and left out in subsequent examples.
To execute the examples provided in this tutorial, the following is needed:
- A valid login (username and password) to the aedifion.io platform. If you do not have a login yet, please contact us regarding a demo login. The login used in the example will not work!
- A project configured for access to timeseries data.
- Optionally, a working installation of Python or Curl.
Importing data
There are two ways of ingesting data into the aedifion.io platform:
- via CSV upload
- via Timeseries upload
- via MQTT as treated in the MQTT Tutorial section
CSV Upload
The POST /v2/project/{project_id}/importTimeseries endpoint allows uploading timeseries data in CSV format. It accepts the following parameters:
| Parameter | Datatype | Type | Required | Description | Example |
|---|---|---|---|---|---|
| project_id | integer | path | yes | The numeric id of the project which to upload data to. | 1 |
| format | string | path | yes | The format of the uploaded data. Currently, only csv format is accepted. | csv |
| on_error | string | query | yes | How to handle parsing errors, either abort or continue. | abort |
| import_file | file | formData | yes | The file containing the data to upload. The CSV dialect (delimiter, quote char, ...) is detected automatically. | Datapoint1,20,2018-12-18 Datapoint2,21,2018-12-19 9:00:00 Datapoint3,39.5,2018-12-19 10:00:00+01 |
CSV format
The preferred CSV format for the uploaded data uses , as delimiter and " as quote character and has exactly the following three columns:
- The datapoint identifier
- The measurement value
- The RFC3339-format timestamp of the measurement
E.g.,
SimpleDPName,100,2018-12-18 8:00:00
"DP with spaces",102.2,2018-12-18 9:00:00
"DP with 'single' quotes, ""double"" qutoes, and delimiter",30,2018-12-18
...
Different CSV dialects (column delimiters, quote chars, ...) as well as datetime formats may be used. Differing formats are detected and processed automatically.
Example of correct file upload
As a first example, let's upload a correct file. We choose to abort on error, so that either the file is uploaded as a whole or nothing is uploaded at all. We're using the following test file which demonstrates different correct formats for datapoint identifiers and timestamps:
"DP with blanks and delimiter ,",10,2018-12-17
DP with forward / slashes // in it,11.1,2018-12-17 1:00:00.000
"DP with single 'qutoes', double ""qutoes"", and the delimiter ','",12.3,2018-12-17T3:00:00+01
Emojimania 😄😁😅😂😌😍,100,2018-12-17 4:00:00+01:00
SimpleASCIIDatapoint,-1,2018-12-17 04:00:00Z
This test file is posted to the API endpoint together with the desired query parameters.
from requests import post

api_url = "https://api.aedifion.io"
auth = ('john.doe@aedifion.com', 'mys3cr3tp4ssw0rd')
project_id = 1
query = {
    'format': 'csv',
    'on_error': 'abort'
}
filename = 'test_upload.csv'
r = post(f"{api_url}/v2/project/{project_id}/importTimeseries",
         auth=auth,
         params=query,
         files={'import_file': open(filename, 'rb')})
print(r.status_code, r.text)
curl "https://api.aedifion.io/v2/project/1/importTimeseries?format=csv&on_error=abort"
    -X POST
    -u john.doe@aedifion.com:mys3cr3tp4assw0rd
    -H 'Content-Type: multipart/form-data'
    -F 'import_file=@test_upload_file.csv'
- Point your browser to https://api.aedifion.io/ui/.
- Click "Authorize" on the upper right and provide your login.
- From the main tags (Meta, Company, ...) select the Project tag ,then the
POST /v2/project/{project_id}/importTimeseriesendpoint (green). - Choose on_error = abort and select a
test_upload_file.csvfrom disk. - Click "Try it out!".
- Inspect the response body and code.
The JSON-formatted response confirms how many lines were parsed and uploaded successfully and how many lines could not be processed. Those lines that could not be parsed are bounced back in the error subfield of the resource field.
{
  "success":true,
  "operation": "create",
    "resource": {
      "total_lines_success": 5,
      "total_lines_error": 0,
      "errors":[],
      "project_id": 1
  }
}
Go on and query the project's datapoints through GET /v2/project/{project_id} and verify that the uploaded datapoints are all there.
[
  ...,
  "DP with blanks and delimiter ,",
  "DP with forward / slashes // in it",
  "DP with single 'qutoes', double \"qutoes\", and the delimiter ','",
  "Emojimania 😄😁😅😂😌😍",
  "SimpleASCIIDatapoint",
  ...
]
Example of incorrect file upload
As a second example, we now upload the following file that is full of errors:
CorrectDatapoint,100,2018-12-18 4:00:00
"Datapoint with backslash \ in it",100,2018-12-18 4:00:00
IncorrectTimestamp,100,181218 40000
IncorrectValue,asdf,2018-12-18 4:00:00
UnescapedDelimiter,inDatapointName,100,2018-12-18 4:00:00
,100,2018-12-18 4:00:00
Using on_error = abort, the API will abort on the first encountered error, discarding any lines that have potentially been parsed successfully prior to the error:
{
  "error": "Error in line 2: Datapoint identifier contains backslash: 'Datapoint with backslash \\ in it'",
  "operation": "create",
  "success": false
}
Using on_error = continue, the API will continue on error and try to parse the other lines. Note that the response code will always be 200 - OK but will include all lines that could not be parsed.
{
  "operation": "create",
  "resource": {
    "total_lines_success": 1,
    "total_lines_error": 5,
    "errors": [
      {"line_no":2, "error":"Datapoint identifier contains backslash: 'Datapoint with backslash \\ in it'"},
      {"line_no":3, "error":"Could not parse third field as datetime: '181218 40000'"},
      {"line_no":4, "error":"Could not parse second field as float: 'asdf'"},
      {"line_no":5, "error":"Could not parse second field as float: 'inDatapointName'"},
      {"line_no":6, "error":"Datapoint identifier is empty"}
    ],
   "project_id": 1
  },
  "success":true
}
The response tells us that only one line was imported successfully (the CorrectDatapoint) while all other lines contained different kinds of errors. Again, note that the endpoint will always return 200 - OK if on_error = continue is set, even if not a single line could be successfully parsed.
Timeseries upload
The POST /v2/project/{project_id}/timeseries endpoint allows uploading timeseries data of multiple datapoints at once. It accepts the following parameters:
| Parameter | Datatype | Type | Required | Description | Example |
|---|---|---|---|---|---|
| project_id | integer | path | yes | The numeric id of the project. | 1 |
| timeseries | dict | body | yes | A dictionary with dataPointIDs as keys and lists of observations as values. Timestamps should be in RFC 3339 format. | {"dataPointID1": [{"time": "2023-01-01T12:00:00Z","value": 1}]} |
Example of correct body upload
As a first example, let's upload a correct body. We're using the following test dictionary which demonstrates the correct format for datapoint identifiers and timestamps:
[{
    "dataPointID2": [{
        "time": "2021-01-01T12:00:00Z",
        "value": 3
    } {
        "time": "2021-01-01T12:00:01Z",
        "value": 5
    }]
} {
    "datapointID3": [{
        "time": "2021-01-01T12:00:00Z",
        "value": 10
    } {
        "time": "2021-01-01T12:00:01Z",
        "value": 2
    }]
}]
This timeseries dictionary is posted to the API endpoint.
from requests import post
import requests

project_id = 1
api_url = "https://api.gorilla.aedifion.io"
auth = ("john.doe@aedifion.com", "mys3cr3tp4ssw0rd")
project_id = 15
ts = {
    "dataPointID2": [{
        "time": "2021-01-01T12:00:00Z",
        "value": 3
    }, {
        "time": "2021-01-01T12:00:01Z",
        "value": 5
    }]
 }

r = requests.post(f"{api_url}/v2/project/{project_id}/timeseries",
                  auth=auth, json=ts)
print(r.status_code, r.text)
- Point your browser to https://api.aedifion.io/ui/.
- Click "Authorize" on the upper right and provide your login.
- From the main tags (Meta, Company, ...) select the Project tag, then the
POST /v2/project/{project_id}/timeseriesendpoint (green). - put the timeseries dictionary in the Timeseries field
- Click "Try it out!".
- Inspect the response body and code.
The JSON-formatted response confirms success of the operation and the resource used.
{
  "operation": "",
  "resource": {},
  "success": true
}
Go on and query the project's datapoints through GET /v2/project/{project_id} and verify that the uploaded datapoints are all there.
    dataPointID2
    datapointID3
Example of incorrect file upload
As a second example, we now upload the following dictionary that is full of errors:
[
  {"Datapoint with backslash \ in it": [
        {
            "time": "2021-01-01T12:00:00Z",
            "value":  'asdf' # Wrong value
        }
        {   "time": "20210101 120001", # Wrong timestamp format
            "value": 5
        }
    ]}
]
{
  "error": "string",
  "operation": "",
  "success": false
}
Exporting data
There are two ways of retrieving data from the aedifion.io platform:
- via JSON export
- via MQTT as treated in the MQTT Tutorial section
JSON export
The endpoint GET /v2/datapoint/timeseries allows querying the data of single datapoints by start and end while optionally using down-sampling or limiting the number of returned observations.
Sparse data with samplerate and max
If you are working with a sparse dataset, such as weekly or monthly meter data, combining samplerate and max can lead to unexpected empty results. If your data has large gaps between observations, see Combining samplerate and max on sparse data before choosing your query parameters.
| Parameter | Datatype | Type | Required | Description | Example |
|---|---|---|---|---|---|
| project_id | integer | query | yes | The numeric id of the project from which to query a datapoint. | 1 |
| dataPointID | string | query | yes | The alphanumeric identifier of the datapoint to query. | bacnet100-4120-CO2 |
| start | datetime | query | no | Return only observations after this time. If start is provided without end, the first max elements after start are returned. | 2018-12-18 00:00:00 |
| end | datetime | query | no | Return only observations before this time. If end is provided without start, the last max elements before end are returned. | 2018-12-18 23:59:00 |
| max | integer | query | no | Maximum number of observations to return. This option is ignored when both start and end are provided. Setting max = 0 returns all available datapoints. | 0 |
| samplerate | string | query | no | The returned observations are sampled down to the specified interval. Allowed intervals are integers combined with durations, like seconds (s), minutes (m), hours (h), and days (d), e.g. 10s or 2m. | 1h |
| units_system | string | query | no | Return the observations in the specified units system. | metric |
| currency_system | string | query | no | Return the observations in the specified currency system. | EUR |
| units | string | query | no | Return the observations in the specified units. | degrees-fahrenheit |
Before we use that endpoint to shoot a couple of example queries for the data, let's insert some more useful data via the CSV upload described above.
[Download: Sun's position over the horizon :fontawesome-solid-download:](download/sun_degrees_over_horizon.csv){: .md-button .md-button--primary }
This dataset describes the degree of the sun's position over the horizon by calendar days in Aachen, Germany. With day 0 equal to new year's, the data looks like this:
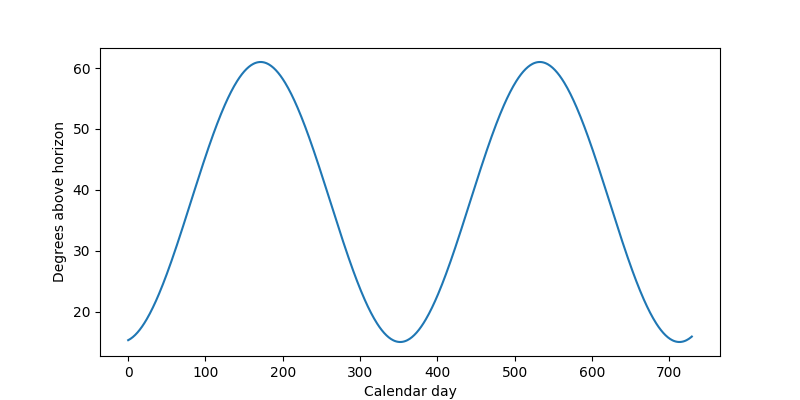
Figure 1: Example of sun degrees over two years
Querying by time window
Let's assume we only want to know the data for one year, e.g., 2018. We can query for this time window by setting the start and end parameters accordingly.
import requests

api_url = "https://api.aedifion.io"
auth = ("john.doe@aedifion.com", "mys3cr3tp4ssw0rd")

query = {
    "project_id": 1,
    "dataPointID": "SunDegreeOverHorizon",
    "start": "2018-01-01",
    "end": "2018-12-31"
}
r = requests.get(f"{api_url}/v2/datapoint/timeseries",
                 auth=auth,
                 params=query)
print(r.status_code, r.text)
curl "https://api.aedifion.io/v2/datapoint/timeseries?project_id=1&dataPointID=SunDegreeOverHorizon&start=2018-01-01&end=2018-12-31"
    -X GET
    -u john.doe@aedifion.com:mys3cr3tp4ssw0rd
- Point your browser to https://api.aedifion.io/ui/.
- Click "Authorize" on the upper right and provide your login.
- From the main tags (Meta, Company, ...) select the Datapoint tag, then the
GET /v2/datapoint/timeseriesendpoint (blue). - Enter start (2018-01-01) and end (2018-12-31) parameter.
- Click "Try it out!".
- Inspect the response body and code.
api_url = 'https://api.aedifion.io';
auth = weboptions('Username','john.doe@aedifion.com','Password','mys3cr3tp4ssw0rd');

project_id = 1;
Start = ['start=','2018-01-01'];
End = ['end=','2018-12-31'];
dataPointID = ['dataPointID=','SunDegreeOverHorizon'];

timeseries = webread([api_url,'/v2/datapoint/timeseries','?project_id=',num2str(project_id),'&',dataPointID,'&',Start,'&',End],auth);
struct2cell(timeseries.data)
The JSON-formatted response contains all observations that could be retrieved for this time period in the data field sorted in ascending order by time. The field dataPointID contains the identifier of the queried datapoint and the field tags lists potential tags on this datapoint.
{
  "data": [
    {"time": "2018-01-01T00:00:00Z", "value": 15.298911202642628},
    {"time": "2018-01-02T00:00:00Z", "value": 15.366655118104344},
    ...
    {"time": "2018-06-20T00:00:00Z", "value": 60.99433444799632},
    {"time": "2018-06-21T00:00:00Z", "value": 60.99973544587385},
    {"time": "2018-06-22T00:00:00Z", "value": 60.99817321953259},
    ...
    {"time": "2018-12-30T00:00:00Z", "value": 15.433282646399174},
    {"time": "2018-12-31T00:00:00Z", "value": 15.514008919830662}
  ],
  "dataPointID": "SunDegreeOverHorizon",
  "tags":[]
}
Querying with downsampling
The above response returns 365 observations of one datapoint in roughly 21 KB of data. Now suppose we do not need such high fidelity data but are content with weekly data and would prefer a faster download. We just add samplerate=7d to the above query.
query = {
    "project_id": 1,
    "dataPointID": "SunDegreeOverHorizon",
    "start": "2018-01-01",
    "end": "2018-12-31",
    "samplerate": "7d"
}
r = requests.get(f"{api_url}/v2/datapoint/timeseries",
                 auth=auth,
                 params=query)
print(r.status_code, r.text)
curl "https://api.aedifion.io/v2/datapoint/timeseries?project_id=1&dataPointID=SunDegreeOverHorizon&start=2018-01-01&end=2018-12-31&samplerate=7d"
    -X GET
    -u john.doe@aedifion.com:mys3cr3tp4ssw0rd
- Point your browser to https://api.aedifion.io/ui/.
- Click "Authorize" on the upper right and provide your login.
- From the main tags (Meta, Company, ...) select the Datapoint tag, then the
GET /v2/datapoint/timeseriesendpoint (blue). - Enter start (2018-01-01) and end (2018-12-31) parameter.
- Additionaly, enter samplerate "7d".
- Click "Try it out!".
- Inspect the response body and code.
The response now only contains 52 observations in 3 KB. Instead of the actual values, we now get the mean over the sample period while the timestamp denotes the left boundary of the sample period, e.g., the mean over the sun's position in degrees over the horizon in the period 2017-12-28 to 2018-01-04 is 15.368...
{
  "data": [
    {"mean": 15.36893921764112, "time": "2017-12-28T00:00:00Z"},
    {"mean": 15.821112043330746, "time": "2018-01-04T00:00:00Z"},
    {"mean": 16.71902616129376, "time": "2018-01-11T00:00:00Z"},
    ...
    {"mean": 15.041726940133113, "time": "2018-12-13T00:00:00Z"},
    {"mean": 15.074493316285318, "time": "2018-12-20T00:00:00Z"},
    {"mean": 15.366242583489504, "time": "2018-12-27T00:00:00Z"}
  ],
  "dataPointID": "SunDegreeOverHorizon",
  "tags": []
}
Auto sampling
The Auto sampling functionality automates the decision of the correct selection of a samplerate based on the provided interval.
There are two things worth mentioning:
- Formula to calculate the samplerate:
(interval of the request) / N - If the response of a request has less than
Nactual values, data is not getting sampled.
N can be set projectwise and defaults to 200.
Querying with limit
Finally, suppose we are only interested in the two days before and after midsummer, i.e., 2018-06-21. We can set start=2018-06-19 and limit the query to five observations by setting max=5. Don't forget to remove the end parameter otherwise max is ignored.
query = {
    "project_id": 1,
    "dataPointID": "SunDegreeOverHorizon",
    "start": "2018-01-01",
    "max": 5
}
r = requests.get(f"{api_url}/v2/datapoint/timeseries",
                 auth=auth,
                 params=query)
print(r.status_code, r.text)
curl "https://api.aedifion.io/v2/datapoint/timeseries?project_id=1&dataPointID=SunDegreeOverHorizon&start=2018-06-19&max=5"
    -X GET
    -u john.doe@aedifion.com:mys3cr3tp4ssw0rd
- Point your browser to https://api.aedifion.io/ui/.
- Click "Authorize" on the upper right and provide your login.
- From the main tags (Meta, Company, ...) select the Datapoint tag, then the
GET /v2/datapoint/timeseriesendpoint (blue). - Enter start (2018-01-01) and max 5.
- Click "Try it out!".
- Inspect the response body and code.
{
  "data": [
    {"time": "2018-06-19T00:00:00Z", "value": 60.981971861064864},
    {"time": "2018-06-20T00:00:00Z", "value": 60.99433444799632},
    {"time": "2018-06-21T00:00:00Z", "value": 60.99973544587385},
    {"time": "2018-06-22T00:00:00Z", "value": 60.99817321953259},
    {"time": "2018-06-23T00:00:00Z", "value": 60.98964824194026}
  ],
  "dataPointID": "SunDegreeOverHorizon",
  "tags": []
}
Indeed, midsummer is the brightest day in the year where the sun reaches a maximum of nearly 61° above the horizon.
Combining samplerate and max on sparse data
Empty results when combining samplerate and max
When using samplerate together with max (without end) on sparse data, the query may return an empty timeseries. This occurs because max limits the number of resampled intervals, including empty ones, before empty intervals are filtered out of the response.
To put it simply: with samplerate=15m and max=3, you are asking the API for the first 3 time intervals of 15 minutes after the given start. If no measurements exist within those 45 minutes, nothing is returned.
When a samplerate is specified, the API creates evenly-spaced time intervals starting from start. For each interval, the mean of any observations within it is computed. If an interval contains no observations, it is marked as empty. The max parameter then limits how many of these intervals are considered, counting from start. Finally, empty intervals are removed from the response.
This becomes a problem when the data is sparse relative to the chosen samplerate. Consider a datapoint MonthlyMeterReading that records one observation roughly every month. Querying with start=2018-01-01, samplerate=15m, and max=100 creates 100 fifteen-minute intervals starting from January 1st — covering only 25 hours. If the first observation is on January 15th, all 100 intervals fall within an empty gap and the response contains no data.
start                                                          first observation
(2018-01-01)                                                   (2018-01-15)
  |                                                                 |
  |--15m--|--15m--|--15m--|--15m--|--15m--| ... |--15m--|    ...    |
    empty   empty   empty   empty   empty         empty           data
  |<---------- max=100 intervals = 25 hours ----------->|
  |<----------------- ~14 days with no data ----------------------->|
To illustrate, consider querying the sparse MonthlyMeterReading datapoint with a 15-minute samplerate and a limit of 3:
query = {
    "project_id": 1,
    "dataPointID": "MonthlyMeterReading",
    "start": "2018-01-01",
    "samplerate": "15m",
    "max": 3
}
r = requests.get(f"{api_url}/v2/datapoint/timeseries",
                 auth=auth,
                 params=query)
print(r.status_code, r.text)
curl "https://api.aedifion.io/v2/datapoint/timeseries?project_id=1&dataPointID=MonthlyMeterReading&start=2018-01-01&samplerate=15m&max=3"
    -X GET
    -u john.doe@aedifion.com:mys3cr3tp4ssw0rd
- Point your browser to https://api.aedifion.io/ui/.
- Click "Authorize" on the upper right and provide your login.
- From the main tags (Meta, Company, ...) select the Datapoint tag, then the
GET /v2/datapoint/timeseriesendpoint (blue). - Enter project_id (1), dataPointID (MonthlyMeterReading), start (2018-01-01), samplerate (15m), and max (3).
- Click "Try it out!".
- Inspect the response body and code.
The response contains an empty data array:
{
  "data": [],
  "dataPointID": "MonthlyMeterReading",
  "tags": []
}
The three 15-minute intervals starting from January 1st (00:00–00:15, 00:15–00:30, 00:30–00:45) contain no observations. After empty intervals are filtered out, the response is empty.
There are several ways to resolve this:
- Set
max=0to return all resampled intervals. Data points beyond the initial empty stretch will be included. - Choose a
sampleratematching the data density. For monthly data, usesamplerate=31d. For daily data, usesamplerate=1d. Avoid samplerates that are much smaller than the actual data frequency. - Omit
samplerateto retrieve the raw observations without creating empty intervals. - Adjust
startcloser to known data points to reduce the empty gap before the first observation.
For example, omitting the samplerate and setting max=0 returns the raw observations directly:
query = {
    "project_id": 1,
    "dataPointID": "MonthlyMeterReading",
    "start": "2018-01-01",
    "max": 0
}
r = requests.get(f"{api_url}/v2/datapoint/timeseries",
                 auth=auth,
                 params=query)
print(r.status_code, r.text)
curl "https://api.aedifion.io/v2/datapoint/timeseries?project_id=1&dataPointID=MonthlyMeterReading&start=2018-01-01&max=0"
    -X GET
    -u john.doe@aedifion.com:mys3cr3tp4ssw0rd
- Point your browser to https://api.aedifion.io/ui/.
- Click "Authorize" on the upper right and provide your login.
- From the main tags (Meta, Company, ...) select the Datapoint tag, then the
GET /v2/datapoint/timeseriesendpoint (blue). - Enter project_id (1), dataPointID (MonthlyMeterReading), start (2018-01-01), and max (0).
- Click "Try it out!".
- Inspect the response body and code.
{
  "data": [
    {"time": "2018-01-15T00:00:00Z", "value": 1791.019},
    {"time": "2018-02-14T00:00:00Z", "value": 1828.323},
    {"time": "2018-03-17T00:00:00Z", "value": 1946.493}
  ],
  "dataPointID": "MonthlyMeterReading",
  "tags": []
}
Alternatively, choosing a samplerate that matches the data density (e.g., samplerate=31d for monthly data) also works:
query = {
    "project_id": 1,
    "dataPointID": "MonthlyMeterReading",
    "start": "2018-01-01",
    "samplerate": "31d",
    "max": 0
}
r = requests.get(f"{api_url}/v2/datapoint/timeseries",
                 auth=auth,
                 params=query)
print(r.status_code, r.text)
curl "https://api.aedifion.io/v2/datapoint/timeseries?project_id=1&dataPointID=MonthlyMeterReading&start=2018-01-01&samplerate=31d&max=0"
    -X GET
    -u john.doe@aedifion.com:mys3cr3tp4ssw0rd
- Point your browser to https://api.aedifion.io/ui/.
- Click "Authorize" on the upper right and provide your login.
- From the main tags (Meta, Company, ...) select the Datapoint tag, then the
GET /v2/datapoint/timeseriesendpoint (blue). - Enter project_id (1), dataPointID (MonthlyMeterReading), start (2018-01-01), samplerate (31d), and max (0).
- Click "Try it out!".
- Inspect the response body and code.
{
  "data": [
    {"mean": 1791.019, "time": "2018-01-01T00:00:00Z"},
    {"mean": 1828.323, "time": "2018-02-01T00:00:00Z"},
    {"mean": 1946.493, "time": "2018-03-04T00:00:00Z"}
  ],
  "dataPointID": "MonthlyMeterReading",
  "tags": []
}
Note that samplerate=31d means a fixed interval of exactly 31 days, not calendar months. The intervals always start from the start timestamp and advance by exactly 31 days each: January 1st, February 1st, March 4th, and so on. The interval boundaries will drift relative to the start of each month over time.
Tip
If you are unsure about the density of a datapoint's data, first query without samplerate and with a small max (e.g., max=3) to inspect the timestamps. This reveals the approximate interval between observations and helps you choose an appropriate samplerate.
Step-by-step: How each parameter combination affects the result
To understand why this happens, consider how each parameter combination behaves for the sparse MonthlyMeterReading datapoint (one observation per month, starting on January 15th):
-
No resampling, no limit (
max=0, nosamplerate): All raw observations are returned as-is: January 15th, February 14th, March 17th, etc. -
Only limit (
max=3, nosamplerate): The first 3 raw observations afterstartare returned: January 15th, February 14th, March 17th. The limit applies directly to actual observations. -
Only resampling (
samplerate=15m,max=0): The API creates a 15-minute interval for every 15 minutes fromstartonwards. The vast majority of these intervals are empty, but empty intervals are filtered out of the response. Only the intervals that happen to contain an actual observation remain: effectively the same result as case 1, but the raw measurements lose their original timestamp, as they are mapped to a 15min interval. -
Resampling + limit (
samplerate=15m,max=3): The API creates 15-minute intervals, but stops after 3 intervals (only 45 minutes fromstart). All 3 intervals are empty because the first observation is 14 days away. After filtering, nothing remains: the response is empty.
In short: with samplerate=15m and max=3, you are asking the API for the first 3 time intervals of 15 minutes after the given start. Since no measurements exist within those 45 minutes, nothing is returned.
Converting timeseries
The HTTP API can convert timeseries from one unit into one compatible other unit. E.g. a timeseries measured in degrees Celsius can be converted to degrees Fahrenheit. The premise for conversion is, that the source units must be known. Provided compatible metadata is imported from the building automation system or the AI algorithm, a source unit is assigned to the datapoint via a system tag. If no system tag is assigned or if the source unit is wrong, you can actively set one yourself.
The conversion can be performed either via providing target systems or specifying a target unit directly.
Converting timeseries via systems
You can provide a units_system (e.g. metric, imperial, ...) and/or a currency_system (e.g. EUR, USD, ...) with each request. The API will determine a fitting unit in those target systems and will automatically convert the observations to it. In the response, you will also see the unit, the data is converted to. All available units_systems and currency_systems can be obtained by requesting the endpoint /v2/labels/systems.
If the source unit is not known (e.g. no metadata has been provided), the conversion will fail. You can set the source units yourself by adding a tag.
query = {
    "project_id": 1,
    "dataPointID": "SunDegreeOverHorizon",
    "start": "2018-01-01",
    "max": 5,
    "units_system": "si",
}
r = requests.get(f"{api_url}/v2/datapoint/timeseries",
                 auth=auth,
                 params=query)
print(r.status_code, r.text)
curl "https://api.aedifion.io/v2/datapoint/timeseries?project_id=1&dataPointID=SunDegreeOverHorizon&start=2018-06-19&max=5&units_system=si"
    -X GET
    -u john.doe@aedifion.com:mys3cr3tp4ssw0rd
- Point your browser to https://api.aedifion.io/ui/.
- Click "Authorize" on the upper right and provide your login.
- From the main tags (Meta, Company, ...) select the Datapoint tag, then the
GET /v2/datapoint/timeseriesendpoint (blue). - Enter start (2018-01-01), max 5 and units_system si.
- Click "Try it out!".
- Inspect the response body and code.
{
  "data": [
    {"time": "2018-06-19T00:00:00Z", "value": 1.0643361933},
    {"time": "2018-06-20T00:00:00Z", "value": 1.0645519612},
    {"time": "2018-06-21T00:00:00Z", "value": 1.0646462264},
    {"time": "2018-06-22T00:00:00Z", "value": 1.0646189604},
    {"time": "2018-06-23T00:00:00Z", "value": 1.0644701715}
  ],
  "dataPointID": "SunDegreeOverHorizon",
  "tags": [
    {
      "id": 42,
      "key": "units",
      "value": "degrees-angular",
      "source": "system"
    }
  ],
  "units": "radians"
}
Warning
Observe, that the system tag still provides the units of the raw data. The returned values are now converted to radians as specified in the units property.
Direct conversion of timeseries into specified unit
If you specify units directly (e.g. degrees-fahrenheit), the API will try to convert the raw data to the target units. The available units can be obtained by querying the /v2/labels/definitions endpoint. All ids of objects with no children, which are descendants of the units object, are available units.
If (as with conversion via systems) the source unit of the timeseries is unknown, the conversion will fail. You can set the source units yourself by adding a tag.
If you specify an incompatible unit (e.g. the data is measured in watts and you want to convert to degrees-celsius) the conversion will fail as well. You have to provide a compatible unit, s.t. the API can perform the conversion.
query = {
    "project_id": 1,
    "dataPointID": "SunDegreeOverHorizon",
    "start": "2018-01-01",
    "max": 5,
    "units": "radians",
}
r = requests.get(f"{api_url}/v2/datapoint/timeseries",
                 auth=auth,
                 params=query)
print(r.status_code, r.text)
curl "https://api.aedifion.io/v2/datapoint/timeseries?project_id=1&dataPointID=SunDegreeOverHorizon&start=2018-06-19&max=5&units=radians"
    -X GET
    -u john.doe@aedifion.com:mys3cr3tp4ssw0rd
- Point your browser to https://api.aedifion.io/ui/.
- Click "Authorize" on the upper right and provide your login.
- From the main tags (Meta, Company, ...) select the Datapoint tag, then the
GET /v2/datapoint/timeseriesendpoint (blue). - Enter start (2018-01-01), max 5 and units radians.
- Click "Try it out!".
- Inspect the response body and code.
{
  "data": [
    {"time": "2018-06-19T00:00:00Z", "value": 1.0643361933},
    {"time": "2018-06-20T00:00:00Z", "value": 1.0645519612},
    {"time": "2018-06-21T00:00:00Z", "value": 1.0646462264},
    {"time": "2018-06-22T00:00:00Z", "value": 1.0646189604},
    {"time": "2018-06-23T00:00:00Z", "value": 1.0644701715}
  ],
  "dataPointID": "SunDegreeOverHorizon",
  "tags": [
    {
      "id": 42,
      "key": "units",
      "value": "degrees-angular",
      "source": "system"
    }
  ],
  "units": "radians"
}
Warning
Observe, that the system tag still provides the units of the raw data. The returned values are now converted to radians as specified in the units property.