Virtual Datapoints
Tutorial on creating and managing virtual datapoints.
Overview
The aedifion API enables the transformation of field data via the use of so-called virtual datapoints. They are used to obtain information that can not directly be measured, such as the aggregation of multiple inputs into a single output, the transformation to another unit, moving averages and much more. In this article, we cover basic concepts and present examples of how to create and manage virtual datapoints via our HTTP API.
Preliminaries
The examples provided in this section partly build on each other. For the sake of brevity, boilerplate code such as imports or variable definitions is only shown once and left out in subsequent examples.
To execute the examples provided in this tutorial, the following is needed:
- A valid login (username and password) to the aedifion platform. If you do not have a login yet, please contact us regarding a demo login. The login used in the example will not work!
- A project that is enabled for virtual datapoints. If virtual datapoints are disabled for your project, please contact us.
- Optionally, a working installation of Python or Curl.
Creating a virtual datapoint
Virtual datapoints are created through the POST /v2/project/{project_id}/virtual_datapoint endpoint. The user must provide the following parameters:
| Parameter | Datatype | Type | Required | Description | Example |
|---|---|---|---|---|---|
| project_id | integer | path | yes | The numeric id of the project. | 1 |
| dataPointID | string | query | yes | The alphanumeric id of the virtual datapoint you'd like to create. | bacnet100-4120-Real-room-temperature-setpoint-RTs_real |
| type | string | query | yes | The type of virtual datapoint. | formula |
| config | json | body (JSON) | yes | Pin and parameter configuration for the datapoint. | {"pins": {"input": {"dataPointID": "power"}}, "parameters": {}} |
| description | string | query | no | A description of the virtual datapoint. | "SHF unit energy counter" |
    virtual_dataPointID = "bacnet100-4120-Power-kW-OG3"
    project_id = 1

    config = {
        "pins": {
            "input": {
                "dataPointID": "bacnet100-4120-Energy_counter-kWh-OG3"
            }
        },
        "parameters": {
            "factorization": 3600
        }
    }

    params = {"dataPointID": virtual_dataPointID, "project_id": project_id, "type": "gradient"}

    r = requests.post(f'{api_url}v2/project/{project_id}/virtual_datapoint',
                      auth=auth, params=params, json=config)
    print(r.text)
    curl -X POST --header 'Content-Type: application/json' --header 'Accept: application/json' --header 'Authorization: Bearer mytoken' -d '{ \
         "pins": { \
             "input": { \
                 "dataPointID": "bacnet100-4120-Energy_counter-kWh-OG3" \
             } \
         }, \
         "parameters": { \
             "factorization": 3600 \
         } \
     }' 'https://api.aedifion.io/v2/project/3/virtual_datapoint?type=gradient&dataPointID=bacnet100-4120-Power-kW-OG3'
- Point your browser to https://api.aedifion.io/ui/.
- Click "Authorize" on the upper right and provide your login.
- From the main tags (Meta, Company, ...) select the Project tag, then the
POST /v2/project/{project_id}/virtual_datapointendpoint (green). - Provide the project_id, type, dataPointID and config value.
- Click "Try it out!".
- Inspect the response body and code.
When this request is posted to the API, the API will check (among permissions) the syntactic correctness of the request and that no other virtual datapoint is active with the same dataPointID. If the request is accepted by the API it is going to be initialized with the status created. The reply from the API is similar to the following:
{
    "operation": "",
    "resource": {
        "dataPointID": "bacnet100-4120-Power-kW-OG3",
        "description": "",
        "logs": [{
            "message": "",
            "status_code": 100,
            "status_text": "Created",
            "ts": "1642162986189027120",
            "type": "status_change"
        }],
        "parameters": {},
        "pins": {
            "input": {
                "aggregate": "max",
                "dataPointID": "bacnet100-4120-Energy_counter-kWh-OG3",
                "data_range": {
                    "count": 1
                },
                "trigger": "every_value"
            }
        },
        "status": "Created"
    },
    "success": true
}
For more information about the API responses, check out the responses section.
The config parameter has many options that heavily depend on the type of the virtual datapoint.
Once created, the virtual datapoint does not automatically start. Use the corresponding endpoint POST /v2/project/{project_id}/virtual_datapoint/run to start the virtual datapoint.
The config parameter
Currently, three virtual datapoint types are available:
- Formulas: A calculation and/or transformation of one or multiple datapoints based on a provided formula.
- Gradients: The rate of change in the value of a datapoint.
- Absolute Air Humidity: A calculation of the absolute air humidity based on the current air temperature and its relative humidity.
The virtual datapoints take other datapoints as inputs (or pins). The data these pins emit into the calculation can be aggregated in a few ways that are described in the section below.
Pins
Up to five pins can be configured as inputs for virtual datapoints. They are configured using at least their dataPointIDs. The optional parameters data_range, trigger and aggregate are explained in more detail below.
In the config, they are differentiated using their ID "P1" to "P5".
"pins": {
    "P1": {"dataPointID": "example_datapoint_1"},
    "P2": {"dataPointID": "example_datapoint_2"},
    "P3": {"dataPointID": "example_datapoint_3"}
    }
Data range
Pins emit values into the calculation of their virtual datapoint based on their aggregation method. If no data-range is configured, observations will simply be forwarded as they are. However, it is possible to, e.g., forward the average of the observations over the last hour. In the config parameter, this is specified with the data_range attribute.
The data_range, i.e. the number of observations that will be considered in the aggregation, can have three different shapes:
Time-based
The data range will have a constant duration and observations older than this durations will no longer be considered.
Example - A data range size of 60 seconds:
"pins": {
    "P1": {"dataPointID": "example_datapoint_1", "data_range": {"time": "60s"}}
}
Count-based
The data range will contain a constant number of values and for every new value, the oldest one will be dropped.
Example - A data range size of 10 values:
"pins": {
    "P1": {"dataPointID": "example_datapoint_1", "data_range": {"count": "10"}}
}
Cron-based
The data range's start and end are defined precisely by a cron-based schedule.
Example - A data range size from Monday midnight until Friday midnight:
"pins": {
    "P1": {"dataPointID": "example_datapoint_1", "data_range": {"start": "0 * * * 1", "end": "59 23 * * 5"}}
}
Aggregation
If the windows are defined as in the data_range examples above, the default aggregation max will be applied.
Available methods are:
last: The value of the most recent observation is emitted.first: The value of the least recent observation is emitted.sum: The sum of all observations is emittedmean: The mean value of all observations is emitted.median: The median value of all observations is emitted.max: The maximum value of all observations is emitted.min: The minimum value of all observations is emitted.timeweighted_mean: The mean value of all observations is emitted, accounting for the duration the respective values were active.integral: The time-integrated value of all observations over the snapshot is emitted. Requires at least two observations in the data range or else 0 will be emitted.
Example:
"pins": {
    "P1": {"dataPointID": "example_datapoint_1", "data_range": {"time": "60s"}, "aggregate": "sum"}
}
Triggers
When exactly the pin emits its value to the virtual datapoint calculation, thereby triggering a new calculation and value to the time-series database, is defined by the trigger.
There are three options for this trigger: every_value, every_minute and every_hour.
Example:
"pins": {
    "P1": {"dataPointID": "example_datapoint_1", "trigger": "every_minute"}
}
Virtual datapoint types
Formulas
Formulas require only the formula parameter, along with the pins required to complete the formula.
This virtual datapoint takes input datapoints (pins) as variables into one or multiple equations. The equations can be chained together and will then be executed sequentially from left to right. They must be separated by a semicolon ; at the end of each equation (<eq_1>;<eq_2>;).
Formulas can be as complex as you want them to be, but only the last equation will return the result for the entire formula. For example, "a=PIN1+PIN2;0;" would always return 0, as it is the last "equation".
Operators and expressions
| Expression | Description | Example |
|---|---|---|
| = | Assign | a = 1; |
| < | Smaller then | a < b; |
| > | Larger then | a > b; |
| <= | Smaller or equal to | a < b; |
| >= | Larger or equal to | a > b; |
| != | Unequal to | a != b; |
| == | Equal to | a == b; |
| + | Add | a + b; |
| - | Subtract | a - b; |
| * | Multiply | a * b; |
| x | Multiply | a x b; |
| / | Divide | a / b; |
| % | Modulo | a % b; |
| min() | Minimum of set | min(a,b); |
| max() | Maximum of set | max(a,b); |
| abs() | Absolute | abs(a); |
| mean() | Mean of set | mean(a,b); |
| median() | Median of set | median(a,b); |
| round() | Round | round(a); |
| sin() | Sinus | sin(a); |
| cos() | Cosinus | cos(b); |
| tan() | Tangens | tan(c); |
| null | Emitting nothing | null; |
Complex expressions
| Expression | Description | Example |
|---|---|---|
| if(condition,then,else) | if expression | if(a>b,a,b); |
| elif(condition,then,condition,then,else,else) | elif expression | elif(a>b,a,a==b,a+b,else,null); |
| AND | and expression | a==b AND b==c; |
| OR | or expression | a==b OR b==c; |
Example:
{
  "parameters": {
    "formula": "a=P1+P2;b=if(a>P3,P3,P4);b;"
  },"pins": {
    "P1": {"dataPointID": "example_datapoint_1", "data_range": {"time": "60s"}, "aggregate": "sum"},
    "P2": {"dataPointID": "example_datapoint_2", "data_range": {"count": "10"}, "aggregate": "integral"},
    "P3": {"dataPointID": "example_datapoint_3", "data_range": {"start": "0 * * * 1", "end": "59 23 * * 5"}, "aggregate": "min"},
    "P4": {"dataPointID": "example_datapoint_5", "data_range": {"time": "60s"}, "aggregate": "sum"}
    }
  }
Check out the examples section for more.
Gradient
The Gradient virtual datapoint type emits the change over time of its reference value. It is calculated by dividing the change in value between the last two observations by the time difference between the two observations.
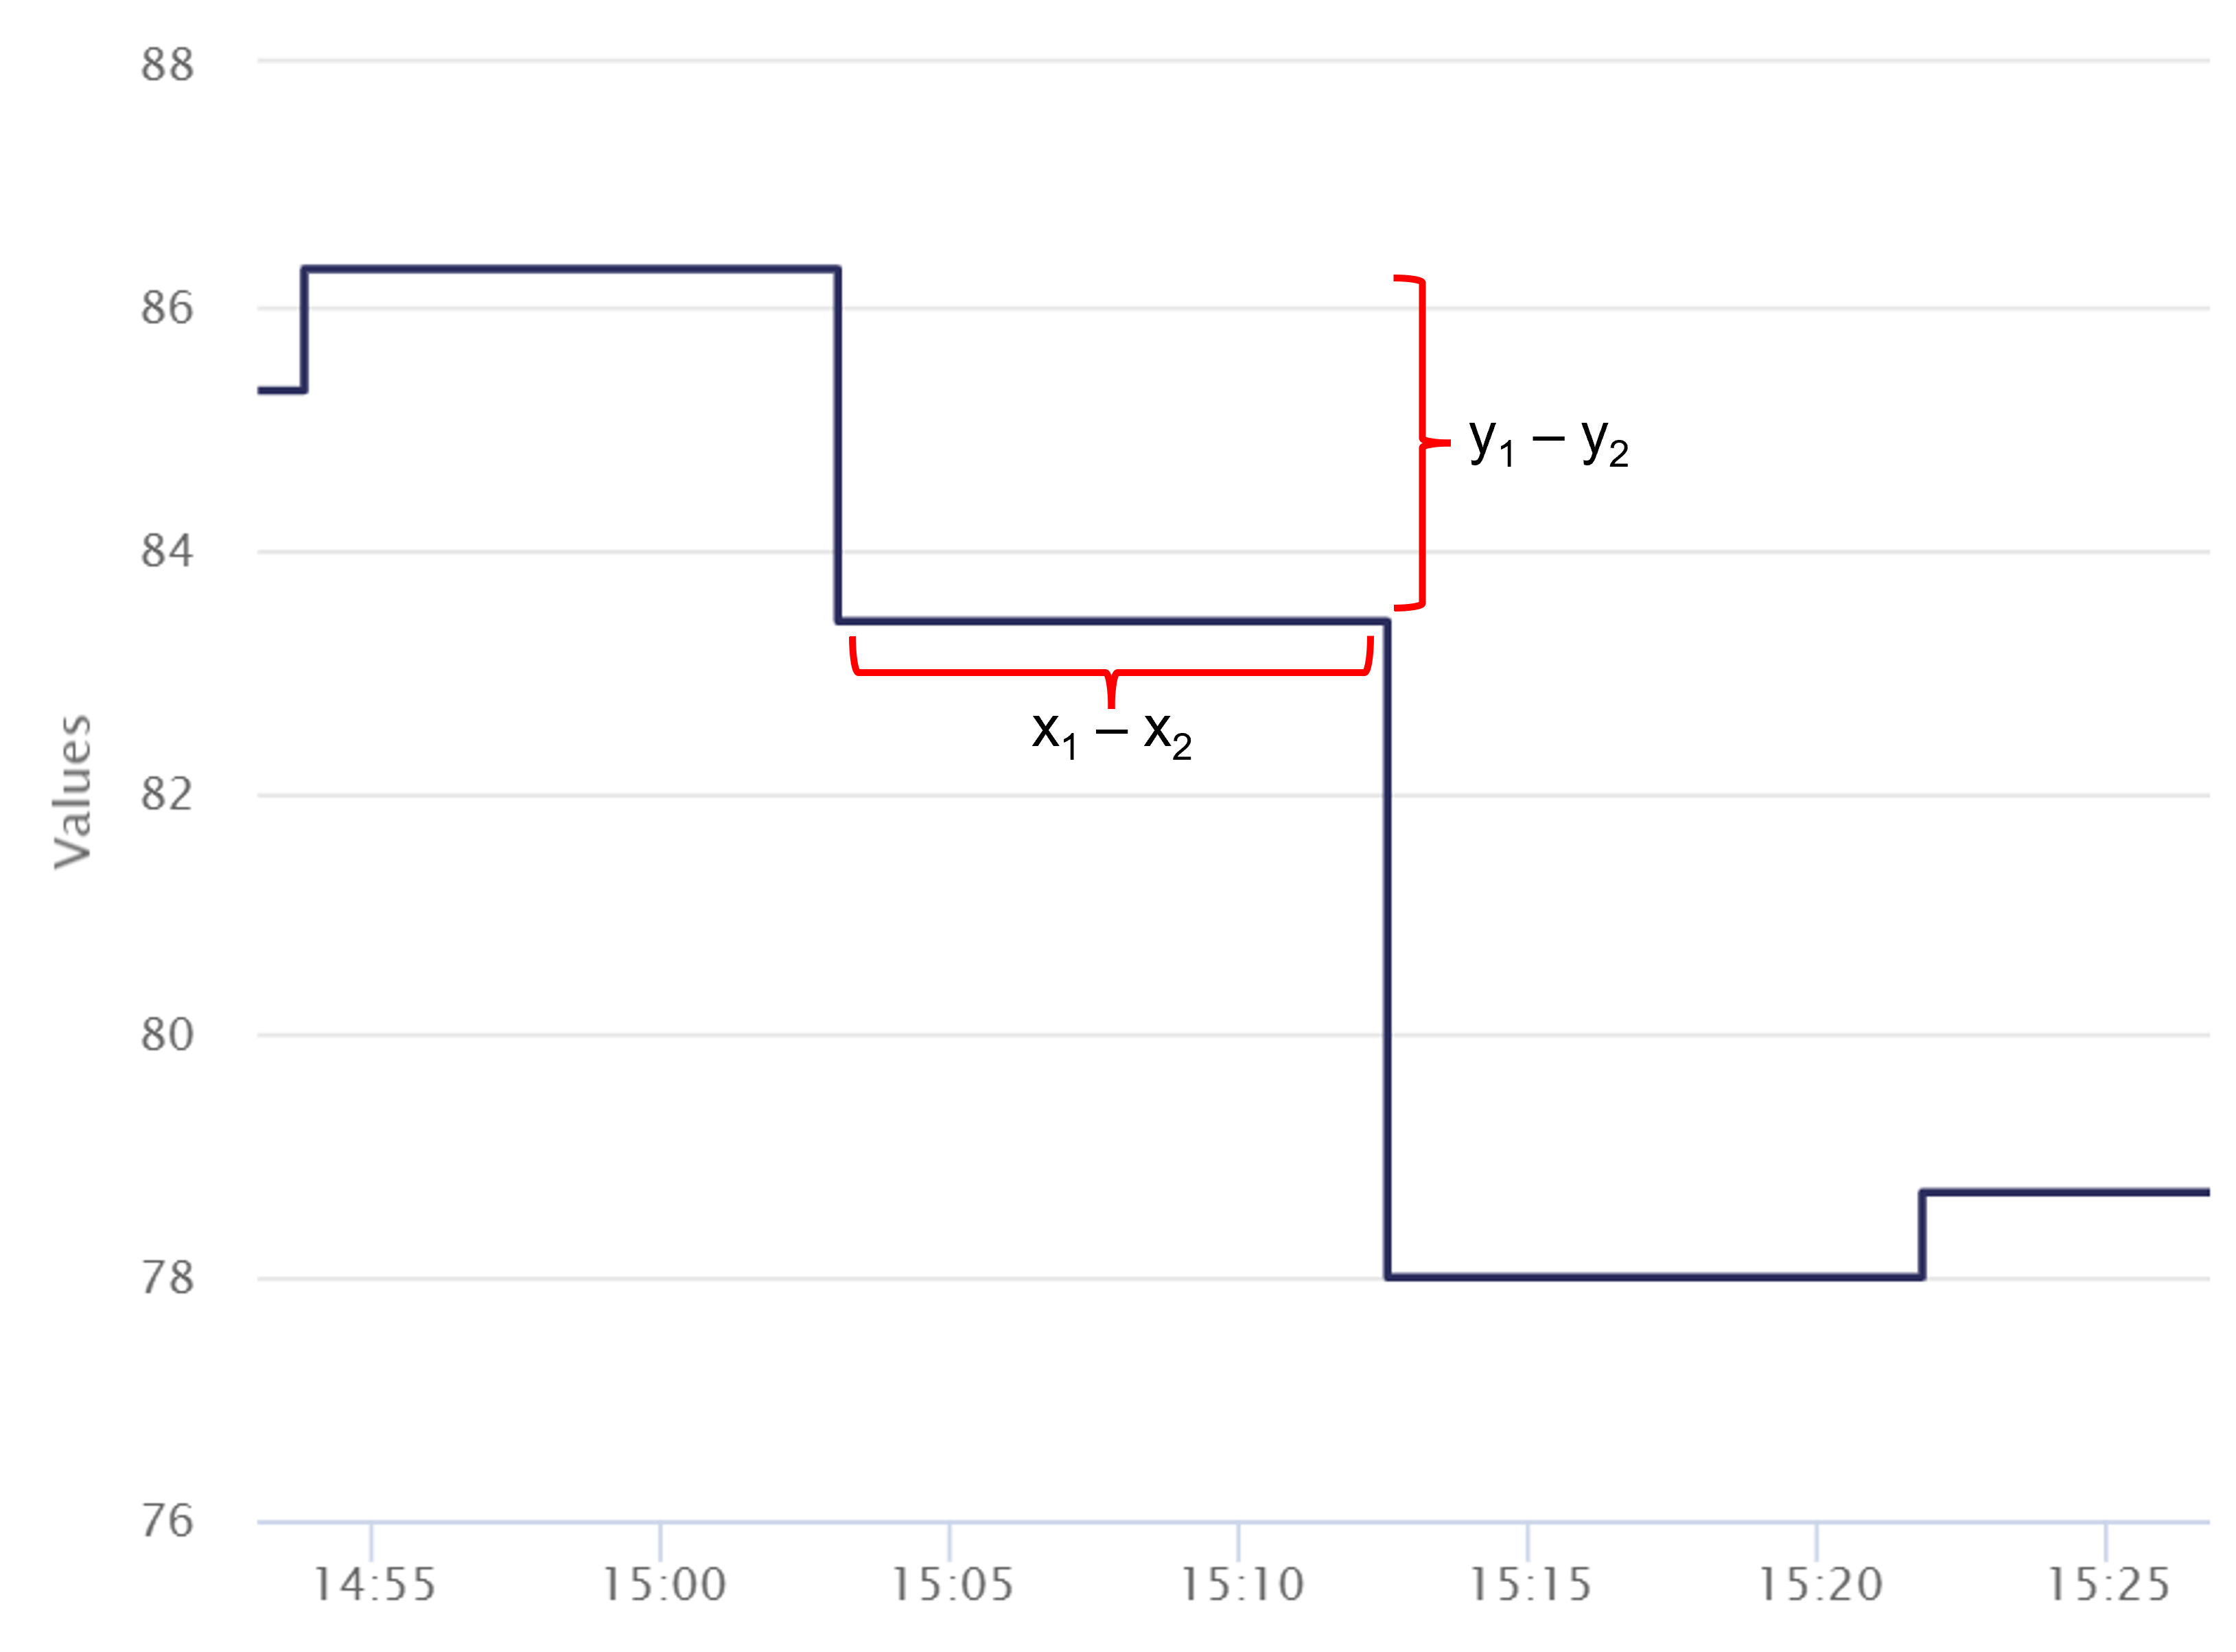
The underlying formula is as follows
value = (x1-x2)/(y1-y2)
where x1 denotes the value of observation 1 at timestamp y1, which denotes the UNIX-timestamp in seconds. The virtual datapoint only takes a single pin named input and an optional parameter: factorization. The resulting value will be multiplied with this value before it is emitted (default value is 1).
👆 Note: The output-event will be emitted after two observations.
👆 Tip: Choose a factorization of 3600 to convert kWh to kW.
{
  "pins": {
    "input": {
      "dataPointID": "power"
    }
  },
  "parameters": {"factorization": 3600}
}
Absolute air humidity
The Absolute Air Humidity EventStream calculates the psychrometric properties of air, based on the Mollier diagram, and emits the absolute humidity of the air. The config takes up to three pins
relative_humidity: The relative humidity of the air.temperature: The air temperature.pressure: The air pressure, optional (defaults to atmospheric pressure of101325 Pa).
and up to three parameters
relative_humidity_unit: Optional (defaults tocount).temperature_unit: Optional (defaults tocelsius).pressure_unit: Optional (defaults toPa).
{
  "parameters": {
    "temperature_unit": "celsius",
    "pressure_unit": "pa",
    "relative_humidity_unit": "percent"
  },
  "pins": {
    "temperature": {
      "dataPointID": "temperature_datapoint",
    },
    "relative_humidity": {
      "dataPointID": "relative_air_humidity_datapoint"
    },
    "pressure": {
      "dataPointID": "pressure_datapoint"
    }
  }
}
Counter
The Counter virtual datapoint type essentially functions as a Formula virtual datapoint with the added capability of accumulating each incoming value with the previous value.
This virtual datapoint accepts two parameters and an unlimited number of pins, offering a high degree of flexibility.
Parameters:
-
formula: A mathematical expression that represents the transformation to be applied to the incoming data. See the Formulas section for more information. -
default_init_value: An optional parameter that determines the starting value of the counter. Defaults to0if not specified.
Pins:
The Counter virtual datapoint takes input datapoints (pins) as variables for one or multiple equations. Up to 20 pins can be specified.
👆 Note: This virtual datapoint type is ideal for creating a virtual energy counter, like in the example below.
{
    "parameters": {
        "formula": "power_integral/3600;",
        "default_init_value": 0
    },
    "pins": {
        "power_integral": {
            "dataPointID": "bacnet100-4120-Power-kW-OG3",
            "data_range": {
                "count": 2
            },
            "aggregate": "integral"
        }
    }
}
Running and stopping a virtual datapoint
Virtual datapoints have to be run manually once created and can be stopped later using the POST /v2/project/{project_id}/virtual_datapoint/run endpoint.
The user must provide the following parameters:
| Parameter | Datatype | Type | Required | Description | Example |
|---|---|---|---|---|---|
| project_id | integer | path | yes | The numeric id of the project. | 1 |
| dataPointID | string | query | yes | The alphanumeric id of the virtual datapoint you are referencing. | bacnet100-4120-Real-room-temperature-setpoint-RTs_real |
| run | bool | query | yes | The desired state of the virtual datapoint. | true |
    dataPointID = "bacnet100-4120-Power-kW-OG3"
    project_id = 1

    params = {"dataPointID": dataPointID, "project_id": project_id, 'run': True}
    r = requests.post(f'{api_url}v2/project/{project_id}/virtual_datapoint/run',
                      auth=auth, params=params)
    print(r.text)
curl -X POST --header 'Content-Type: application/json' --header 'Accept: application/json' --header 'Authorization: Bearer mytoken' 'https://api.aedifion.io/v2/project/1/virtual_datapoint/run?dataPointID=bacnet100-4120-Power-kW-OG3&run=true'
- Point your browser to https://api.aedifion.io/ui/.
- Click "Authorize" on the upper right and provide your login.
- From the main tags (Meta, Company, ...) select the Project tag, then the
POST /v2/project/{project_id}/virtual_datapoint/runendpoint (green). - Provide the project_id, dataPointID and run value.
- Click "Try it out!".
- Inspect the response body and code.
When this request is posted to the API, the API will check (among permissions) the syntactic correctness of the request and update the state of the virtual datapoint. The reply from the API is similar to the following:
{
    "dataPointID": "bacnet100-4120-Power-kW-OG3",
    "description": "",
    "logs": [{
        "message": "",
        "status_code": 100,
        "status_text": "Created",
        "ts": "1642162986189027120",
        "type": "status_change"
    }, {
        "message": "",
        "status_code": 102,
        "status_text": "Ready to start",
        "ts": "1642162986322888428",
        "type": "status_change"
    }, {
        "message": "Run requested by user 'user@aedifion.com'.",
        "status_code": 200,
        "status_text": "Starting",
        "ts": "1642166713759059232",
        "type": "status_change"
    }],
    "parameters": {},
    "pins": {
        "input": {
            "aggregate": "max",
            "dataPointID": "bacnet100-4120-Energy_counter-kWh-OG3",
            "data_range": {
                "count": 1
            },
            "trigger": "every_value"
        }
    },
    "status": "Starting"
}
For more information about the API responses, check out the responses section.
The virtual datapoint is now up and running.
Deleting a virtual datapoint
Virtual datapoint are deleted through the DELETE /v2/project/{project_id}/virtual_datapoint endpoint. The user must provide the following parameters:
| Parameter | Datatype | Type | Required | Description | Example |
|---|---|---|---|---|---|
| project_id | integer | path | yes | The numeric id of the project. | 1 |
| dataPointID | string | query | yes | The alphanumeric id of the virtual datapoint you are referencing. | bacnet100-4120-Real-room-temperature-setpoint-RTs_real |
    dataPointID = "bacnet100-4120-Power-kW-OG3"
    project_id = 1

    params = {"dataPointID": dataPointID, "project_id": project_id}

    r = requests.delete(f'{api_url}v2/project/{project_id}/virtual_datapoint',
                      auth=auth, params=params)
    print(r.text)
curl -X DELETE --header 'Accept: application/json' --header 'Authorization: Bearer mytoken' 'https://api.aedifion.io/v2/project/1/virtual_datapoint?dataPointID=bacnet100-4120-Power-kW-OG3'
- Point your browser to https://api.aedifion.io/ui/.
- Click "Authorize" on the upper right and provide your login.
- From the main tags (Meta, Company, ...) select the Project tag, then the
DELETE /v2/project/{project_id}/virtual_datapointendpoint (red). - Provide the project_id and dataPointID.
- Click "Try it out!".
- Inspect the response body and code.
Virtual datapoints have to be stopped before they can be deleted. When this request is posted to the API, the API will check (among permissions) the syntactic correctness of the request and then remove the virtual datapoint from the database.
The reply from the API is similar to the following:
    {
    "dataPointID": "bacnet100-4120-Power-kW-OG3",
    "description": "",
    "logs": [{
        "message": "Delete requested by user 'max@mustermann.com'.",
        "status_code": 500,
        "status_text": "Deleting",
        "ts": "1642167865149656933",
        "type": "status_change"
    }],
    "parameters": {},
    "pins": {
        "input": {
            "aggregate": "max",
            "dataPointID": "bacnet100-4120-Energy_counter-kWh-OG3",
            "data_range": {
                "count": 1
            },
            "trigger": "every_value"
        }
    },
    "status": "Deleting"
}
For more information about the API responses, check out the responses section.
The virtual datapoint has now been removed from the database
Updating a virtual datapoint
Virtual datapoints can be updated with the PUT /v2/project/{project_id}/virtual_datapoint endpoint. Currently, only the description parameter is updated.
| Parameter | Datatype | Type | Required | Description | Example |
|---|---|---|---|---|---|
| project_id | integer | path | yes | The numeric id of the project. | 1 |
| dataPointID | string | query | yes | The alphanumeric id of the virtual datapoint you are referencing. | bacnet100-4120-Real-room-temperature-setpoint-RTs_real |
| update | json | yes | body (JSON) | The parameter to update. | {"description": "This is a brand-new description."} |
    dataPointID = "bacnet100-4120-Power-kW-OG3"
    project_id = 1

    params = {"dataPointID": dataPointID, "project_id": project_id}

    r = requests.put(f'{api_url}v2/project/{project_id}/virtual_datapoint',
                     auth=auth, params=params, json={"description": "This is a brand new description."})

    print(r.text)
curl -X PUT --header 'Accept: application/json' --header 'Authorization: Bearer mytoken' 'https://api.aedifion.io/v2/project/1/virtual_datapoint?dataPointID=bacnet100-4120-Power-kW-OG3'
- Point your browser to https://api.aedifion.io/ui/.
- Click "Authorize" on the upper right and provide your login.
- From the main tags (Meta, Company, ...) select the Project tag, then the
PUT /v2/project/{project_id}/virtual_datapointendpoint (yellow). - Provide the project_id, dataPointID and the body of the json containing the parameter to update for update.
- Click "Try it out!".
- Inspect the response body and code.
When this request is posted to the API, the API will check (among permissions) the syntactic correctness of the request and then update the respective datapoint.
The reply from the API is similar to the following:
    {
    "dataPointID": "bacnet100-4120-Power-kW-OG3",
    "description": "This is a brand new description.",
    "logs": [],
    "parameters": {},
    "pins": {
        "input": {
            "aggregate": "max",
            "dataPointID": "bacnet100-4120-Energy_counter-kWh-OG3",
            "data_range": {
                "count": 1
            },
            "trigger": "every_value"
        }
    },
    "status": "Ready to start"
    }
For more information about the API responses, check out the responses section.
Listing virtual datapoints
Existing virtual datapoints can be queried through the GET /v2/project/{project_id}/virtual_datapoints endpoint. The user must provide the following parameters:
| Parameter | Datatype | Type | Required | Description | Example |
|---|---|---|---|---|---|
| project_id | integer | path | yes | The numeric id of the project. | 1 |
| search | string | query | yes | Virtual datapoints matching the search string will be returned. | "Power" |
| filter | string | query | yes | Virtual datapoints with one or more key=value pairs will be returned. | status_code=102 |
The filter can currently only be applied to filter for status codes. For more info, checkout the section on status codes
    dataPointID = "bacnet100-4120-Power-kW-OG3"
    project_id = 1

    params = {"project_id": project_id, "filter": "status_code=102", "search": "Power"}

    r = requests.post(f'{api_url}v2/project/{project_id}/virtual_datapoints',
                      auth=auth, params=params)
    print(r.text)
curl -X GET --header 'Accept: application/json' --header 'Authorization: Bearer mytoken' 'https://api.aedifion.io/v2/project/1/virtual_datapoints'
- Point your browser to https://api.aedifion.io/ui/.
- Click "Authorize" on the upper right and provide your login.
- From the main tags (Meta, Company, ...) select the Project tag, then the `GET /v2/project/{project_id}/virtual_datapoints endpoint (blue).
- Provide the project_id, dataPointID, search and filter values.
- Click "Try it out!".
- Inspect the response body and code.
When this request is posted to the API, the API will check (among permissions) the syntactic correctness of the request return the respective virtual datapoints. The reply from the API is similar to the following:
{
  "items": [
    {
      "dataPointID": "bacnet100-4120-Power-kW-OG3",
      "status": "Running"
    }
  ],
  "meta": {
    "current_page": 1,
    "items_per_page": 20,
    "total_items": 1,
    "total_pages": 1
  }
}
For more information about the API responses, check out the responses section.
Querying a virtual datapoint
Existing virtual datapoints can be queried through the GET /v2/project/{project_id}/virtual_datapoint endpoint. The user must provide the following parameters:
| Parameter | Datatype | Type | Required | Description | Example |
|---|---|---|---|---|---|
| project_id | integer | path | yes | The numeric id of the project. | 1 |
| dataPointID | string | query | yes | The alphanumeric id of the virtual datapoint you'd like to create. | bacnet100-4120-Real-room-temperature-setpoint-RTs_real |
    dataPointID = "bacnet100-4120-Power-kW-OG3"
    project_id = 1

    params = {"dataPointID": dataPointID, "project_id": project_id}

    r = requests.get(f'{api_url}v2/project/{project_id}/virtual_datapoint',
                      auth=auth, params=params)
    print(r.text)
curl -X GET --header 'Accept: application/json' --header 'Authorization: Bearer mytoken' 'https://api.aedifion.io/v2/project/1/virtual_datapoint?dataPointID=bacnet100-4120-Power-kW-OG3'
- Point your browser to https://api.aedifion.io/ui/.
- Click "Authorize" on the upper right and provide your login.
- From the main tags (Meta, Company, ...) select the Project tag, then the `GET /v2/project/{project_id}/virtual_datapoint endpoint (blue).
- Provide the project_id and dataPointID.
- Click "Try it out!".
- Inspect the response body and code.
When this request is posted to the API, the API will check (among permissions) the syntactic correctness of the request and return information on the respective virtual datapoint. The reply from the API is similar to the following:
{
  "dataPointID": "bacnet100-4120-Power-kW-OG3",
  "description": "",
  "logs": [],
  "parameters": {},
  "pins": {
    "input": {
      "aggregate": "max",
      "dataPointID": "bacnet100-4120-Energy_counter-kWh-OG3",
      "data_range": {
        "count": 1
      },
      "trigger": "every_value"
    }
  },
  "status": "Running"
}
For more information about the API responses, check out the Responses section.
Responses
When sending a request to any of the virtual datapoint API endpoints, a reply will occur in the form of a JSON body. All the responses of virtual datapoint related endpoints contain a JSON body with the following six parameters:
dataPointID: The alphanumeric id of the respective virtual datapoint.description: The included description of the respective virtual datapoint.logs: The virtual datapoint's log history. For a detailed explanation check out the logs section below.parameters: The parameters of the respective virtual datapoint.pins: The pins of the respective virtual datapoint.status: The virtual datapoint's status in a dictionary format including the status code and its message string.
Logs
The virtual datapoint's log history is a list of JSON bodies, containing every change that occurred during the lifetime of the virtual datapoint. The JSON body is made up of five parameters:
message: A message describing the change that occurred.status_code: The status code. Check out the status codes section for further information.status_text: A single-word status message.ts: The timestamp of the change in unix-nanoseconds.type: The type of event causing the log message.
Status codes
We use status codes to describe the state of virtual datapoints.
The following status codes are in use:
| Status Code | Description |
|---|---|
| 100 | Created |
| 101 | Creation faile |
| 102 | Ready to start |
| 200 | Starting |
| 201 | Start failed |
| 202 | Running |
| 300 | Stopping |
| 301 | Stop failed |
| 302 | Stopped |
| 303 | Stopped due to technical maintenance |
| 304 | Health check failed |
| 500 | Deleting |
| 501 | Delete failed |
Config Examples
- Return the maximum temperature that was reached in the last 24 hours in two rooms.
{
  "parameters": {
    "formula": "max(P1,P2);"
  },"pins": {
    "P1": {"dataPointID": "room1_temperature", "data_range": {"time": "1d"}, "aggregate": "max"},
    "P2": {"dataPointID": "room2_temperature", "data_range": {"time": "24h"}, "aggregate": "max"}
    }
  }
- Return the maximum temperature of a room since midnight.
{
  "parameters": {
    "formula": "P1;"
  },"pins": {
    "P1": {"dataPointID": "room1_temperature", "data_range": {"start": "0 0 * * *", "end": "59 23 * * *"}, "aggregate": "max"}
    }
  }
- Return the maximum temperature of a room this week.
{
  "parameters": {
    "formula": "P1;"
  },"pins": {
    "P1": {"dataPointID": "room1_temperature", "data_range": {"start": "0 0 * * 1", "end": "59 23 * * 5"}, "aggregate": "max"}
    }
  }
- Return
1if at least one pump out of two is active (active means their operating message is at1, inactive means0).
{
  "parameters": {
    "formula": "max(P1,P2);"
  },"pins": {
    "P1": {"dataPointID": "pump_1_operating_message"},
    "P2": {"dataPointID": "pump_2_operating_message"}
    }
  }
Alternative formulas for the example above are P1==1 OR P2==1;, if(P1==0,P2,P1); or if(P1+P2>0,1,0);.
- Return
1if at least one pump out of two is active (active means their operating message is at1, inactive means0) while the valve of the system is closed (closed means below 5% opening). If not, emit nothing.
{
  "parameters": {
    "formula": "a=max(P1,P2);if(a==1 AND PIN3<5,1,null);"
  },"pins": {
    "P1": {"dataPointID": "pump_1_operating_message"},
    "P2": {"dataPointID": "pump_2_operating_message"},
    "P3": {"dataPointID": "valve_1_opening"}
    }
  }
More
Missing a feature? Request it!