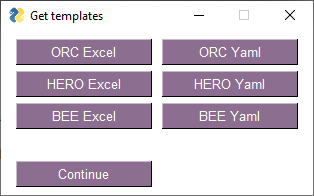
.controls
Find writable setpoints
To find writable setpoints, you have two options. You can either find setpoints by checking the datapoints that are pinned to components in the project, or you can start off with a specific datapoint naming schema if you already found it or are not working with existing components.
Working with a known datapoint naming schema
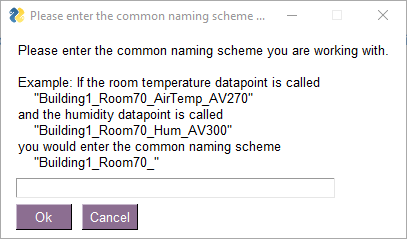
If you already know the naming schema of the controller you are working with, you can just enter it here. For example, if all setpoints and measurements of the room/AHU/etc. you are working with start with Building1_Room70_ followed by individual datapoint names and types, you can enter the naming scheme here and enable the gui to find all relevant datapoints automatically.
Once the naming scheme has been selected, the GUI gathers all necessary information regarding possible setpoint candidates, their current status and displays the setpoint testing window.
Working with components
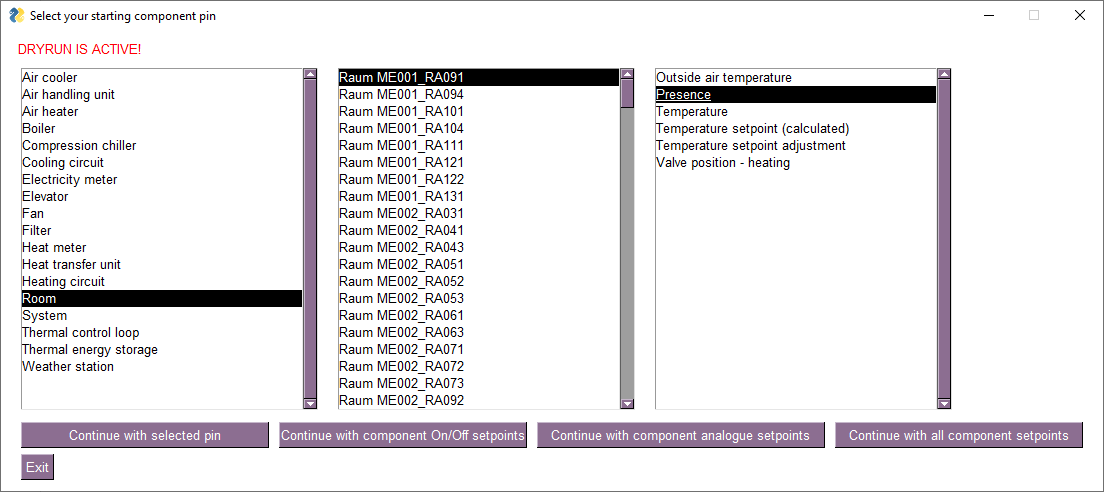
If you want to find writable setpoints based on the building components, you can select this option, and in the following window select the component and its corresponding pin (or only the setpoint type, such as On/Off or analogue). Once you selected your target setpoint, the GUI makes a suggestion of possible naming schemas.
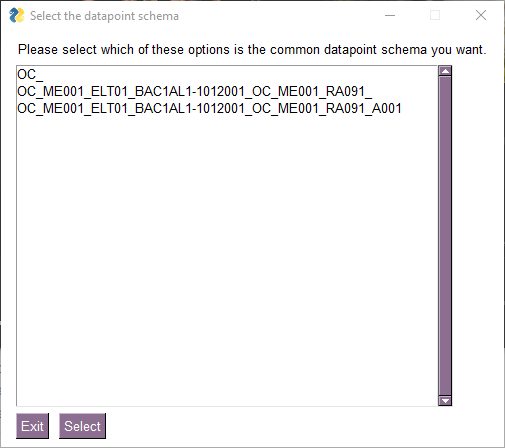
It lets the user make the decision, which datapoint schema might be the correct one for the controller they are working with. In the example below, the first option OC_ would be too vague and likely result in hundreds or thousands of datapoints being selected and displayed. The third option might already be too specific, since it seems to include a datapoint type at the end. Therefore, the second option seems to be the correct choice in this case
Once the naming scheme has been selected, the GUI gathers all necessary information regarding possible setpoint candidates, their current status and displays the setpoint testing window.
Setpoint testing window
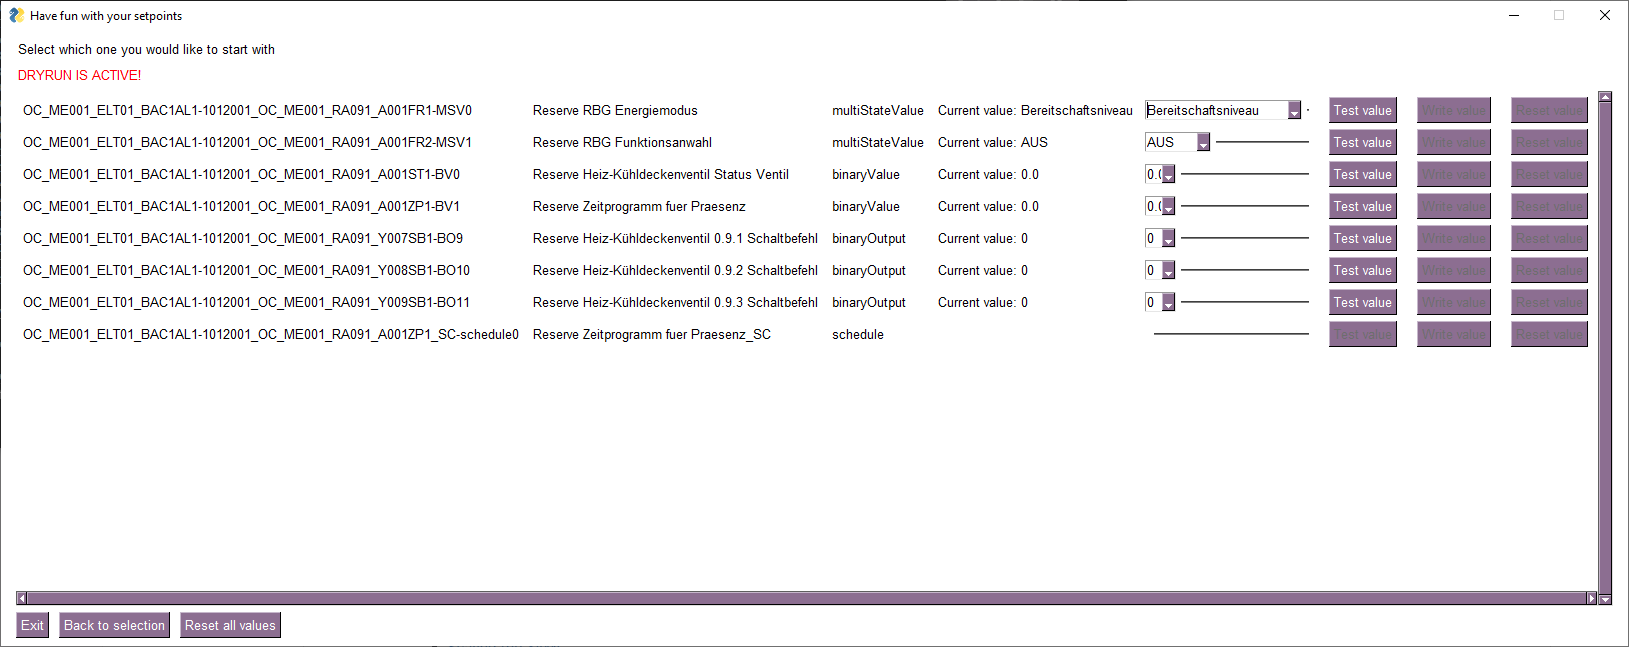
The setpoint testing window allows the user to systematically go through the setpoint candidates and automates many of the necessary steps.
The setpoint testing window consists of the following items, which are automatically adjusted to fit the setpoint type 1. Datapoint ID: contains the name of the datapoint. By right clicking it, you get the options to copy the datapoint id into your clipboard, show the current values in the frontend, or even additionally show the associated components values in the frontend, if you chose the datapoint based on a component
-
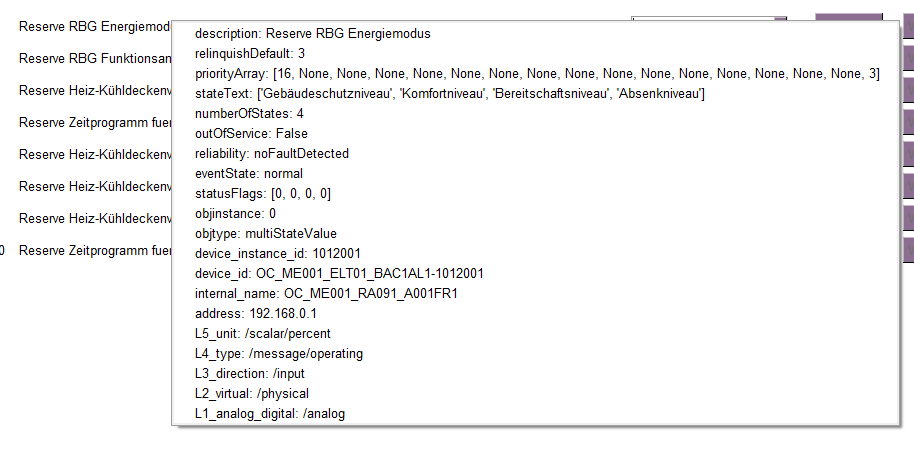
Datapoint description: contains the description of the datapoint. By right clicking it, you also get the full list of tags associated with the datapoint. These contain relevant information, so take a look!
-
Datapoint type: the datapoint type, as specified in the datapoint tags
- Current Value: the last value of the datapoint, before the window was opened (Note: Currently, this value is not being refreshed!)
-
Writing value selection/input field: Drop-Down menu or input field, where you can enter the value you want to write to the setpoint. For multi state values, these are automatically replaced with the correct names of the states, as specified in the datapoint tags (if the corresponding tag does not exist, only the sate number values are shown)
-
Test, Write and Reset buttons: the heart of the functionality and explained in the following section.
By clicking the Test button, the value selected/entered in the writing value input field is sent to the datapoint as a setpoint in dryrun mode. This means that the edge device will check for writability of this datapoint, without actually writing to it. You always have to do this step for any datapoint, before being allowed to write to it without the dryrun enabled.
If this is the first write command sent to the datapoint, the gui will try to set the writing boundaries. For multi state values and binary values these are set automatically, but for analogue values, a secondary window will appear, prompting you to enter the writing boundaries. Enter possible boundaries that you might expect for this datapoint, e.g. min 18 and max 25 for a room temperature setpoint. These writing boundaries can later be changed via the api, if you made any mistakes.
If the test was successful, the Write value button is enabled for the corresponding datapoint. Once you click it, your selected value is sent as a setpoint without dryrun, and the GUI will monitor the edge devices response. If the setpoint write command is accepted, a browser window will automatically open, and enable the user to monitor whether the write command has actually changed the datapoint, and whether this has any influence on the other datapoints pinned in the component.
If the writing was successful, the Reset value button is enabled. This allows you to set the value back to it´s original current value (or if priority arrays are enabled, it will automatically free up or reset the used priority to allow the local controller and facility manager to take back control)
Additionally, the Reset all values button allows you to reset all values you have changed while this window was open
The GUI is set up in a way that avoids closing or exiting the window without resetting all values, but should some unexpected error occur, you can check the gui logs for a full list of the setpoints, your written values, the reset values and their priorities, so in the worst case scenario, you can manually reset them using the API.
Manage custom controlsapps
There are many reasons why you might need a custom controlsapp:
- the customer has an unordinary system configuration that does not fit with our standard controlsapps
- you need to plug multiple controlsapps/eventstreams together while adding custom logic, because the customer wants to add more conditions to when the controlsapps are active
- you want to manage how multiple controlsapps interact when interacting with the same system
All this can be achieved with the help of the "Manage custom controlsapps" functionality of the gui. For this, you simply have to connect individual nodes and fill out all the input fields that are relevant to you. The nodes in the tool represent an instance, a class, or a method. In our case it may represent the pins, eventstreams, controlsapps, etc.
Here is a list of the most useful nodes available to you:
Simple Pin
A simpler Pin node with initializer's ID and source's ID set as init_ID and source_ID.
Input: - name (String) : the name of the pin, which is used as the pin name in the eventstreams formula or the controlsapp. - fqdn (String) : pin's literal fqdn (datapoint id), or placeholder name if you want to apply this eventstream configuration to multiple components.
Output: - pin (Dict) : dictionary of the pin with its parameters
Expert Pin [If you need additional options. Most likely you will only ever need Simple Pin]
Input: - name (String) : the name of the pin, which is used as the pin name in the eventstreams formula or the controlsapp. - initializer/id (String) : the initializer's ID or column name - source/filters/fqdn (String) : Pin's literal fqdn source or placeholder name if you want to apply this eventstream configuration to multiple components. - source/id (String) : the source's ID or column name - dict (overrides) (Dict) : Dictionary containing key-value pair which will be added to the pin. Pairs with the same key will override the value.
To add custom triggers, like cron, to the pin, input the dictionary into the dict (overrides).
{'window':{'trigger':{'type':'cron','cron':"0 0 * * *"}}}
Output: - pin (Dict) : Dictionary of the pin with its parameters
EventStream
Input: - event/type (String) : the event's type - fqdn (String) : eventstream's literal fqdn source or excel column name. - params (Dict) : eventstream's params - pins (Dict) : pin's or pins' config - sinks (list[String]) : list of sinks with format ['foo','bar'] - type (String) : eventstream's type (formula, orc, etc) - dict (overrides) (Dict) : dictionary containing key-value pair which will be added to the pin. Pairs with the same key will override the value.
Output: - eventstream config (Dict) : dictionary of the pin with its parameters - fqdn (String) : eventstream's literal fqdn source or excel column name.
Control App
Input: - ack_topic (String) : - alive_timeout (Integer) : - auto_recovery (Boolean) : - channel (String) : - msg_topic (String) : - peer_id (String) : - eventstream config(s) (Dict) : dictionary containing eventstream(s) - dict (overrides) (Dict) : Dictionary containing key-value pair which will be added to the pin. Pairs with the same key will override the value.
Output: - controlsapp config (Dict) : dictionary of the control app with its parameters
Join Node
The join node allows user to join multiple pins, eventstreams, controlsapps or join nodes as a single config dictionary.
Input: - 5 Node (Dict) : configs which will be joined as one dictionary
Output - combined pins/eventstreams/controlsapps (Dict) : a single config dictionary containing all the configs in input
Bee Params
Input: - blocked_by_action_taken (Float) : Time for which no more actions should be taken after our action in minutes - blocked_by_user_action (Float) : Time for which no more actions should be taken after user action in minutes - day_time_temperature_cooling_limit (Float) : Minimum day time temperature for which cooling mode is active in °C - day_time_temperature_heating_limit (Float) : Minimum day time temperature for which heating mode is active in °C - max_room_temperature (Float) : Maximum room temperature during occupancy - orientation (Float) : Orientation of the building facade in ° (e.g. 0, 45, etc.) or as a direction, (e.g. "N", "NE", etc.). Default: South (180 °) - significant_solar_radiation (Float) : Minimum day time temperature for which cooling mode is active in °C
Output: - eventstream params (Dict) : params ready as input for eventstream node
Hero Params
Input: - default_supply_air_temperature_setpoint : Supply temperature setpoint of air handling unit in °C - fan_temperature_increase : Temperature by which the fan increases the supply air temperature in K - heat_recovery_efficiency : Heat recovery efficiency between 0 and 1 - max_supply_air_temperature : Upper limit of the supply air temperature setpoint of the air handling unit in °C
Output: - eventstream params (Dict) : params ready as input for eventstream node
Save YAML
Input: - controlsapp config (Dict) : config from control app to be saved as YAML file - path (String) : path to save the YAML file
Provided the
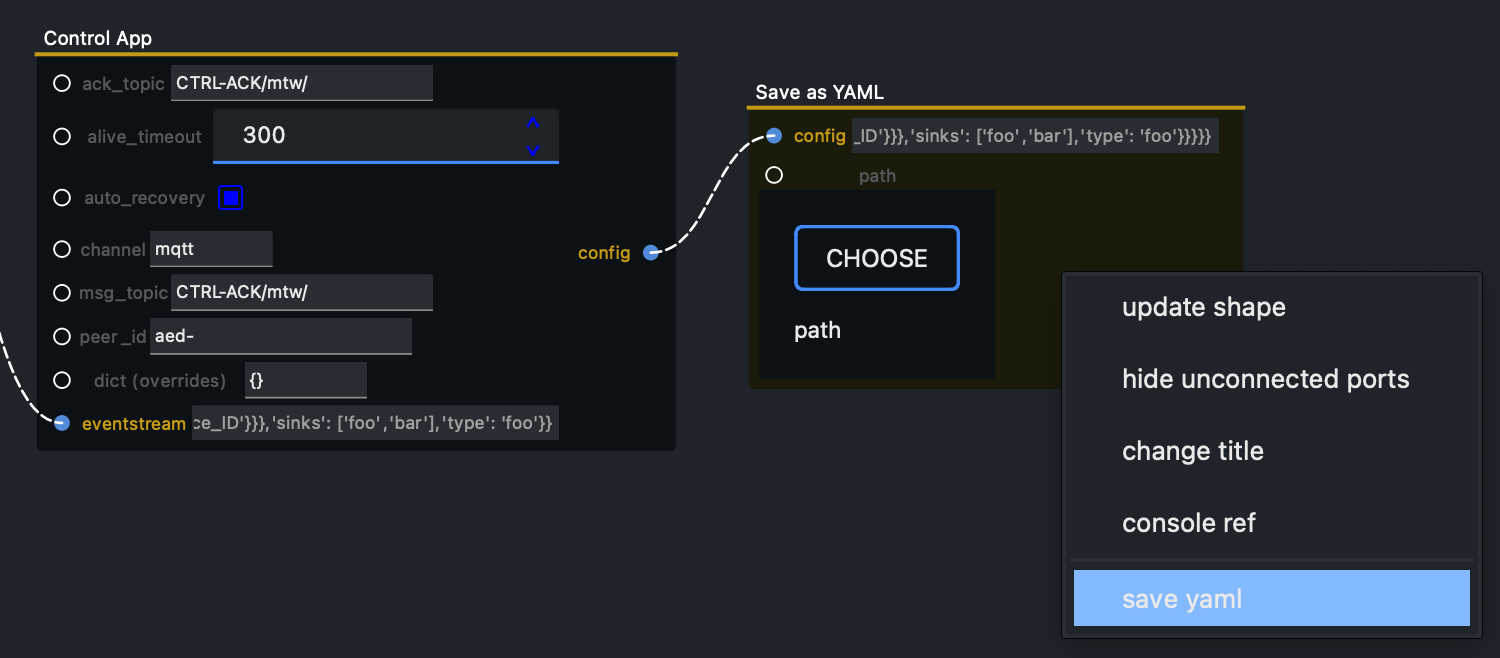
controlsapp configand thepath, to save the config as YAML file, right-click the node and selectsave YAML.
YAML 2 DICT
The YamlLoad node allows user to convert a yaml format string into dictionary
Input: - YAML input (String) : a string with YAML format
Output: - config dict (Dict) : dict converted yaml string
How to create a control-app
1. Open the ryven tool
Run the gui and select Manage custom controlsapps, then select Create New Project
2. Start adding nodes
Nodes can be found on the left side of the window. Just drag-and-drop them into the central window.
3. Joining multiple pins/eventstreams/controlsapps
Every node can relate to multiple other nodes. A Pin can easily be connected to multiple eventstreams. But currently, due to technical limitations, any individual point in a node can only accept a single ingoing connection. So to connect several pins to the same eventstream, you have to join them, using the Join Node.

4. Creating an eventstream and control-app
Configure the eventstream. Simply join the output of the Join Node to the eventstream's pins input and join the eventstream config output to the control-app.

5. Saving the control-app config as YAML
Join the config output into the Save YAML node. Select the path. Right-click the Save Yaml node and select save YAML.
The control apps scaler
If you want to apply the controlsapps you just configured to multiple components, such as every room in a building, you can easily scale them. You can du this either manually with iterators, or with the config scaler.
The iterators work just like the scaling tool for components.
The config scaler allows user to scale the config.yaml template and create a YAML file containing multiple control apps. The scaler requires the YAML template and the Excel Workbook. The YAML file contains values with the template ${to_be_replaced} representing the column names. The value will then be replaced with the value inside the Excel table
Setting up the YAML template before scaling
Create the YAML manually, use our ryven tool, or use an old YAML config. The tool is able to scale one type of control-app or multiple control-app simultaneously.
The orc config file below is a good example:
control_apps:
  ad80fc13-1477-43fe-8000-29e3aae6447c:
    ack_topic: CTRL-ACK/mtw/
    alive_timeout: 300
    auto_recovery: true
    channel: mqtt
    event_streams:
      f50e2584-4aa3-49a5-bf96-a99b90d80e27:
        event:
          type: SetPointEvent
        fqdn: ${fqdn_s}
        params:
          base_room_temperature: 22
          offset_limit: 4
        pins:
          ambient_temperature:
            initializer:
              id: ${init_ID}
            source:
              filters:
                fqdn: ${ambient_temperature}
              id: ${source_id}
          room_temperature:
            initializer:
              id: ${init_ID}
            source:
              filters:
                fqdn: ${room_temperature}
              id: ${source_id}
          schedule:
            initializer:
              id: ${init_ID}
            source:
              filters:
                fqdn: ${schedule}
              id: ${source_id}
          temperature_offset:
            initializer:
              id: ${init_ID}
            source:
              filters:
                fqdn: ${temperature_offset}
              id: ${source_id}
        sinks:
        - .mqtt.ctrl.sink
        type: orc
    msg_topic: CTRL-ACK/mtw/
    peer_id: aed-
With the config template, we want to scale it to multiple control-apps with different FQDNs. The source's and initializer's ID are to be changed as well. The following values from the YAML file, representing the column name, will be changed: - source_id - init_ID - fqdn_s - ambient_temperature - room_temperature - schedule - temperature_offset
Similar to batch create with iterators, user can also replace only a part of the value for example:
not_replaced_${to_be_replaced}.
Configure manually with iterators
Access this tool by selecting Configure manually button. This tool allows user to use string templates such as not_replaced_${to_be_replaced} to scale and replace parts or the whole value.
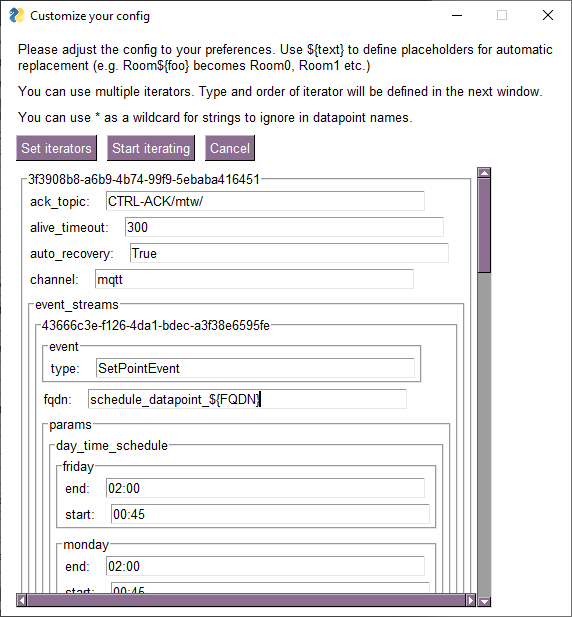
Without the template identifier
${}. The values will be considered constant for all apps.For the tutorial on using the iterator please see the batch create guide!

After setting up the iterators, the scaled yaml, yaml template, as well as Excel table is ready to be downloaded. User can then use the Excel template as well as yaml template to rescale the control apps with updated values.
Setting up the Excel workbook when using the automatic scaling tool

The rows of the table represent the control-apps with different values, and the columns represent the values to be replaced from the YAML file.
Additionally, a column with column name app_id is required. The app_id is the index of the control-app's config in the YAML file. The different index represent the different control-apps configs in the YAML when scaling multiple YAML simultaneously.
When scaling a single config just put in 0 for all rows!
Scaling the YAML
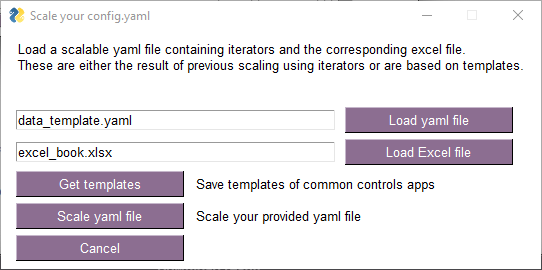
To get a scaled YAML file: 1. select your yaml template 2. select your Excel workbook 3. click Scale with excel
With the GUI, user can also download both excel and yaml templates. After making changes on the template, use the GUI again to scale the control-app.
